6.4 Eyes
Once you know the different eye shapes off by heart, placement of eyeshadow becomes so much easier! In addition to product placement, the colours you choose will also have a big impact on the overall look. If you remember back to the colour theory lesson, using complementary colours will help to ensure eyes pop. The guide below is a good point of reference when selecting shadow colours:
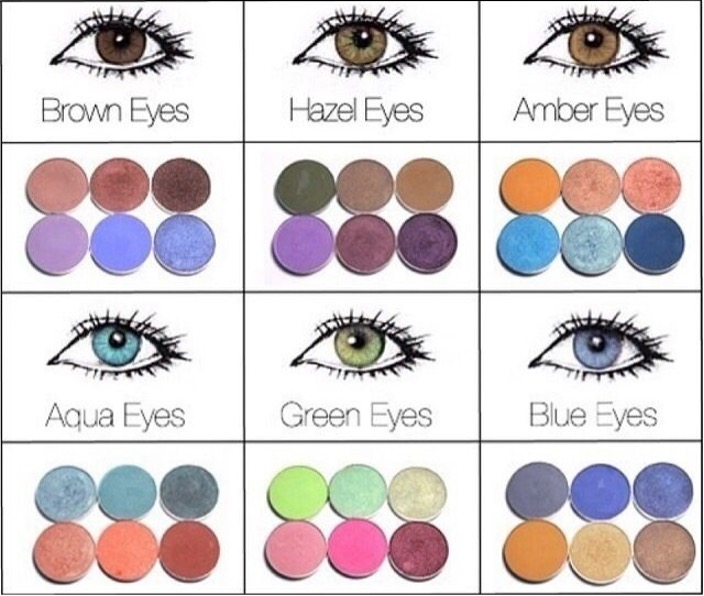
Clients with brown eyes will tend to have the widest range of colour choices because brown is a neutral colour. Clients who have green/hazel eyes will really stand out when wearing purple and plum based tones as it will really bring out the green hues. For clients with blue/grey eyes, you should opt for bronze and yellow tones to help them stand out. If your clients wants a different colour, that is completely fine, but when selecting colours for your clients, remember your colour theory!
To learn more about colour choices for eye makeup, access the resources linked:
Once you have your colours sorted, you then need to think about the style you need to achieve. There are thousands of different shadow techniques ranging from the most basic (a wash, ombre and deep crease) and more advanced techniques such as:
Once you have your colours sorted, you then need to think about the style you need to achieve. There are thousands of different shadow techniques ranging from the most basic (a wash, ombre and deep crease) and more advanced techniques such as:
- Smoky eye
- Halo
- Cut crease
- Bridal
- Editorial
Before jumping into your first smoky eye, it is best to practice your skills using the wash, ombre or deep crease technique first. Once you get the hang of product placement in accordance with eye shapes and practice your blending, learning the smoky eye will be so much easier!
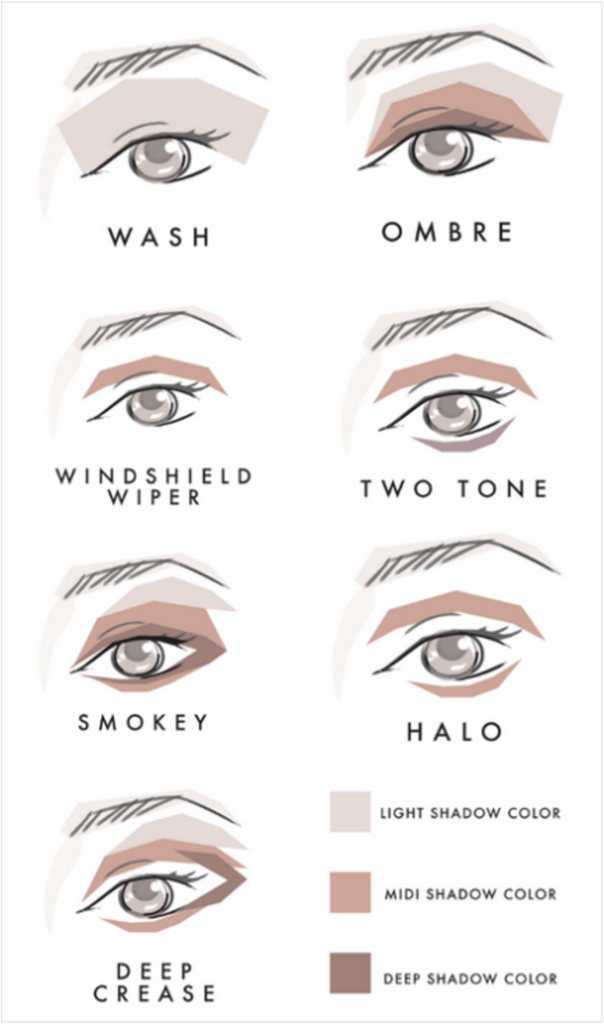
Ombre
The wash technique is where you apply one colour across the entire lid – easy, right? The ombre shadow technique is more advanced than this, and it is where you create an ombre look from the upper lash line to the brow bone. An ombre eye starts with our darkest shade close to the upper lash line and blending up towards the brow using a transition shade. Depending on the depth required, you may need two to three colours to transition from your darkest to the lightest shade. This is a simple, effective eye shadow technique that can be used in any colour palate or depth of colour, from a smoky black to a natural everyday brobnze.
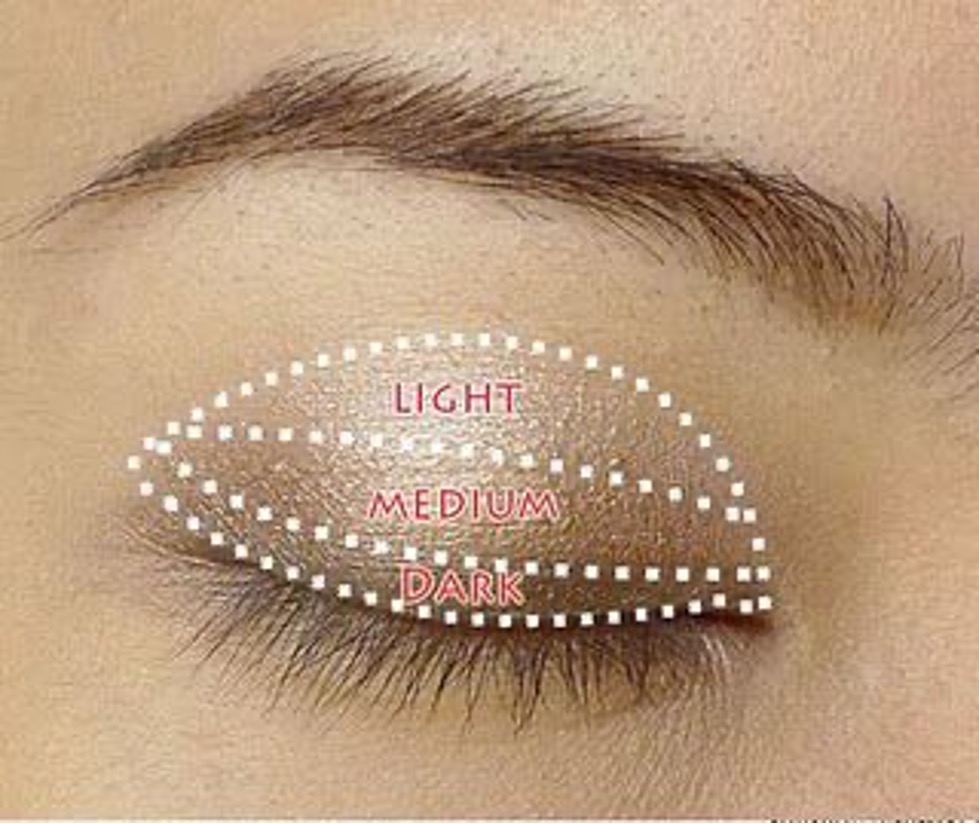
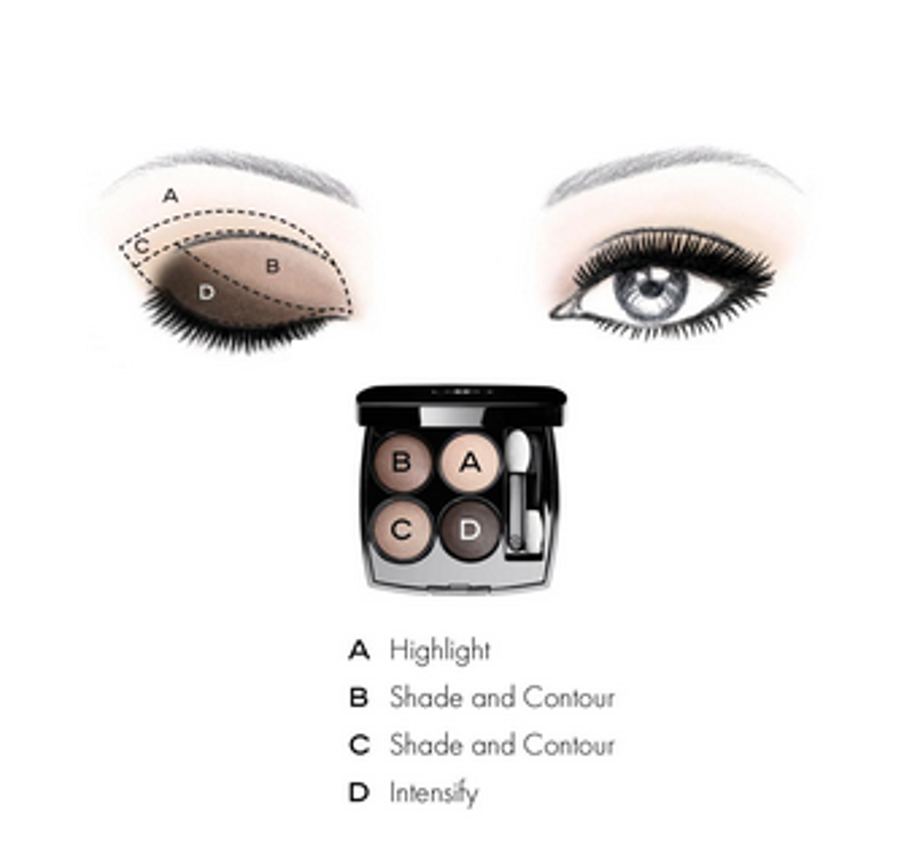
You might be thinking, does the ombre looks a lot like the smoky eye? Yes, it does! The difference between the two is the smoky eye look also smokes out the lower lash line, whereas an ombre shadow application focuses solely on the mobile lid. So, once you have nailed your ombre eye, you are very close to mastering the smoky eye!
To apply an ombre eyeshadow, our expert recommends you do the following:
- Using your eyeshadow palette, select two to three shades (dark, medium and light) that will complement your client’s eye colour. How many shades you use is dependent upon the depth of your darkest shade. If you go with a deep shade, you will likely need an additional two shades to transition to your client’s skin tone. However, if you you use a lighter shade for your mobile lid colour, you may only need a single transition shade.
- Using your shadow brush, dip it into the darkest shade (tapping off the excess) and apply it from the upper lash line all over the mobile lid up to the eye socket and no higher. This first mobile lid colour can be a choice of a shimmer or a matte shade. If you have chosen a shimmer shade, be sure not to take this any higher than the socket.
- Next, use your blending brush and dip it into your transition shade (medium colour) and tap off the excess. Blend this transition shade through the socket. A little tip here is to blend out any product before picking up any additional product onto your brush. Blend this right up to the brow bone, being careful not to have too much product on your brush.
- If using a third transition colour, now blend this up to the eyebrow bone.
Watch the below video to see our expert create an Ombre eyeshadow look.
Deep crease
The deep crease technique is one of the most requested eye looks. This is because it looks flattering on nearly all eye shapes, and it can be a fantastic way to elongate the eye. Essentially with a deep crease technique, the darkest shadow is in a ‘V’ shape in the outer corner of the eye, and the lightest shade is in the inner corner. Think of the deep crease as a horizontal ombre and the ombre technique as a vertical ombre!
Not blended

Blended
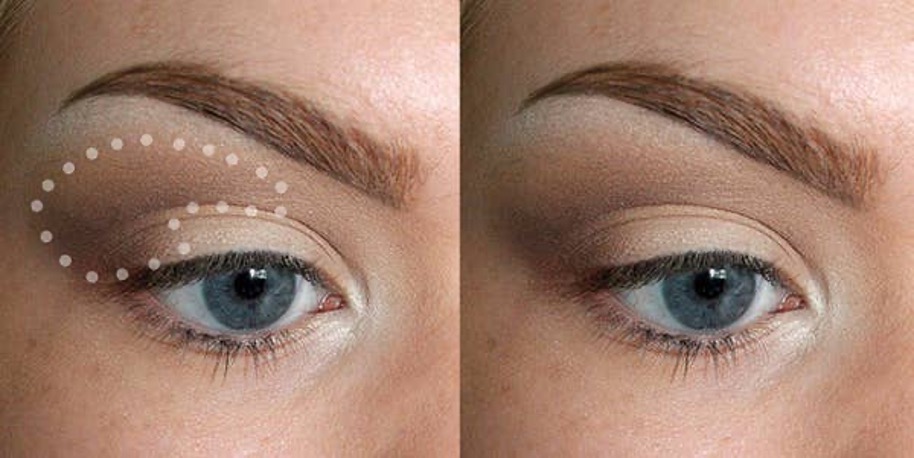
The deep crease look can look natural, or you can make it more dramatic depending on your colour choices. To avoid harsh lines, be sure to build up your colours. Lighter colours are a lot easier to blend, so you are using black or other dark colours – less is always more! It is always much easier to add more colour than it is to remove colour. When you are starting out, you will make mistakes – that is completely normal. To prevent having placement that is not symmetrical, keep switching between both eyes for each step. For example, apply the base colour to both eyes, the outer V to both eyes and then the transition shade.
To apply a deep crease eyeshadow, our expert recommends you do the following:
- Using your eyeshadow palette, select your three shades (dark, medium and light) that will complement your client’s eye colour.
- Take your transition shade first (medium colour) with a blending brush and map out the socket using back and forth motions. This is to be a matte shade that you can easily blend up all the way to the brow bone.
- Next, go in with your deeper shade in a triangle shape (V shape) on the outer edge of the eye and bringing that colour in a third of the way onto the mobile lid. This deeper shade also needs to be a matte colour, and you can blend this up into the socket if you wish to create a little more intensity.
- Next, using a shadow brush, apply the lightest shade (shimmer or a matte) and take this from the inner rim along the mobile lid to meet our deepest shade on the outer edge. Really press this product into the mobile lid using the flay part of your brush.
- Once all colours have been applied, blend these colours together using a fluffy brush.
Watch the below video to see our expert create a deep crease eyeshadow look.
Once you are happy with your looks, which can be as blended or as crisp as you like, you can then clean up any fallout under the eye. Fallout is a beauty term for shadow or product that has fallen off the lid and onto the cheeks or under the eyes.
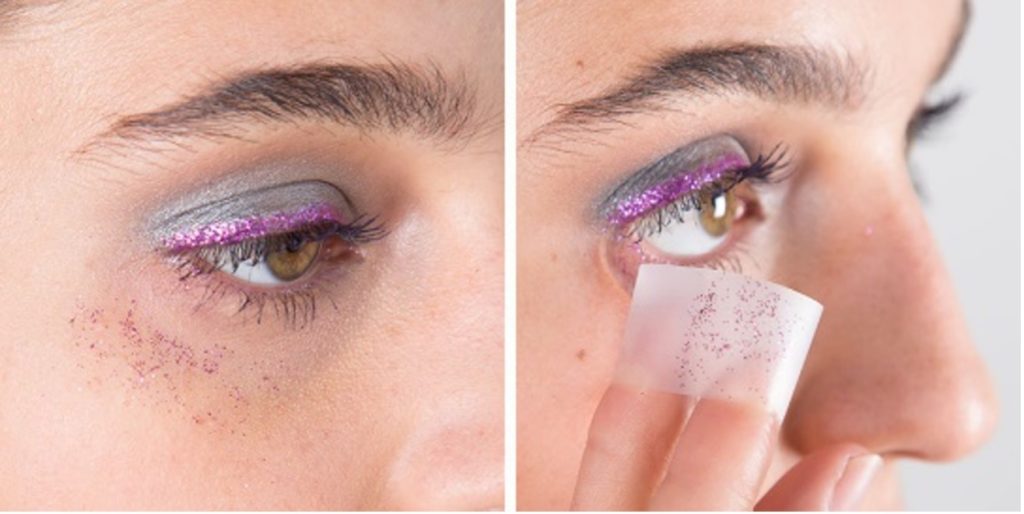
To manage fallout, you can apply under eye shields, or it is just as easy to use a makeup remover like micellar water and a cotton tip clean up. If you have already done your base, you will need to re-hydrate the eye and then reapply concealer and set. For both of the looks we have covered so far, we haven’t touched the bottom lash line. To create a balanced look, take your techniques a step further and practice adding shadow to the lower lash line.
When adding shadow to the lower lash line, you can use one colour, or you can mirror the ombre of the mobile lid. Usually, you will apply the darkest shade on the outer corner, medium shade in the middle and lightest shade in the inner corner. If you are feeling creative, try out different gradients and colours on the lower lash line and see how they turn out! If you want some extra pop, be sure to apply your colour theory and consider adding a complementary colour in the mix.
Advanced techniques
Now that you have the basics, you might want to try out some of the more advanced techniques. Remember, before jumping into these, be sure to master the ombre and deep crease first. One of the best ways to learn is to watch other MUAs apply these styles and then, of course, practice, practice, practice!
Follow the below links to see a range of video tutorials:
Follow the below links to see a range of video tutorials:
Do’s and don’ts
When determining shadow placement and colour, eye shape will play an important part. Remember, we want to elongate and lift, so correct eye contouring with shadow is essential! As a visual, consider the following tips for each eye shape:
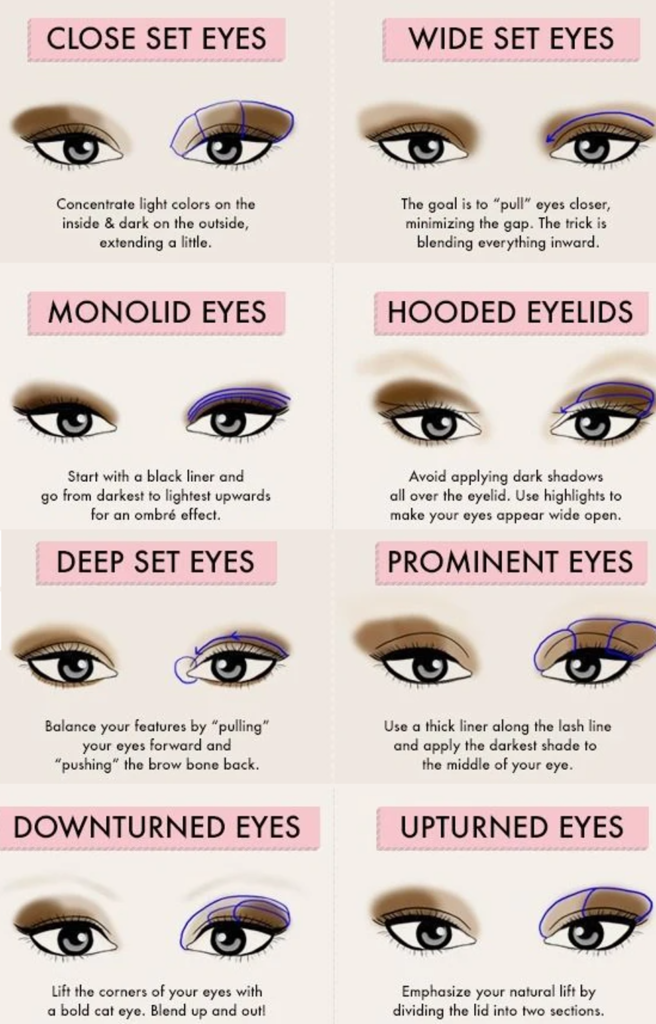
Placement gets a lot easier with practice, and you will soon see if you have applied the shadow correctly because if you haven’t, the eye may look droopy or tired. Check out some additional tips from our expert:
| Eye shape | Makeup do’s and don’ts from our expert: |
| Wide-set | If the eyebrows are also wide-set, bringing them in slightly can help the eyes to look more proportional. When using a darker colour in the socket, bring it right into the corners of the inner eye. Do not use a bright highlighter between the eyes. |
| Deep-set | Apply a lighter colour onto the inner rim and mobile lid, then use a deeper matte shade along and just above the socket and blend upwards. Avoid highlighting the brow bone. |
| Close-set | Use light colours on the inner corners of the eyes and dark colours on the outer corners to create the illusion of the eyes being drawn outwards. |
| Hooded | Shade over the hooded area in a dark matte colour to create the illusion of a socket and make the brow bone less prominent. Experiment with wing liner to see if it is possible by having your client look directly forward to see if the skin/hood will interfere with the shape of the liner. Each individual hooded eye will be slightly different, so access as you go. Do not use a thick liner along the entire upper lid, as you will cover the majority of your visible mobile lid. |
| Monolid | Monolid’s are prone to smudging, so make sure your products are smudge-proof or waterproof. Do not use a kohl eye pencil, for example. You will need to blend your shadow up quite high for it to be visible. Have your client look directly forward so you can see where your eyeshadow needs to blend to be visible. Don’t try to create a fake crease; just work with the eye shape rather than trying to create something different. Experiment! Have a play around with a thick wing and false lashes, as this can look fantastic on a monolid |
| Downturned | Make sure your shadows on the outer edges of the eyes are angled upwards to create lift. If you are creating a wing liner, make sure this is also angled upwards. Do not use a heavy lash right to the outside of the eye. Instead, opt for a lighter lash or do not take the false lash right to the edge, as this will emphasize the downturn. |
| Upturned | Upturned eyes are a beautiful eye shape where you can create many looks due to the visible mobile lid. Try experimenting with a cut crease or a smoky eye. To balance out an upturned eye, you can take your shadow straight out at the edges towards the temple. |
| Protruding | Protruding eyes can be wonderful to work on as a makeup artist as you have plenty of room to create your masterpiece. It also allows you to use dark shadows and liners without worrying about them closing up the eye. If your client’s eyes are rounded, the aim is to elongate the eye. Create this by using a dark shadow from the middle to the outer edges of the eye and continue the shadow past the outer edge of the eye. A wing liner or soft shadow wing can also help to create an elongated effect. Shade under the eye from the middle to the outer edge to emphasize the outer corner of the lower lash line. Do not line completely around the eye in a dark colour, as this will accentuate the round shape. |
Eyeliner
As you have already learned, eyeliner comes in many forms from pencil, gel and liquid. You can also use a dark shadow to line the eyes if you want a softer look. While the Ancient Egyptians loved a big and bold liner, as you have seen through the trends over the decades, eyeliner can be applied in so many different ways.
Depending on the look you are trying to achieve, eyeliner can make the eyes look smaller, larger and more open. Applying eyeliner takes skill, and like all makeup techniques, practice makes perfect!
The black eyeliner is a makeup staple for any makeup kit, although these days, there are a whole range of colours to chose from. If you are selecting colours other than black, you will need to think about colour theory principles. As a general guide, consider the following eyeliner colours for each eye colour:
- Brown eyes – all colours work well, although earthy tones will make them look seductive, and colours like blue, vivid purple and greens can make the eyes pop.
- Hazel eyes– brown and green tones will always look fabulous, and if you want to make the green in the eyes stand out, use plum, purple and copper colours
- Green eyes – red will really make the eyes stand out, but if your client doesn’t want red eyeliner, then use red-based colours such as burgundy or mahogany
- Blue eyes – warm brown-toned eyeliner is gorgeous on blue eyes, and copper, gold and orange tones will really bring out the blue
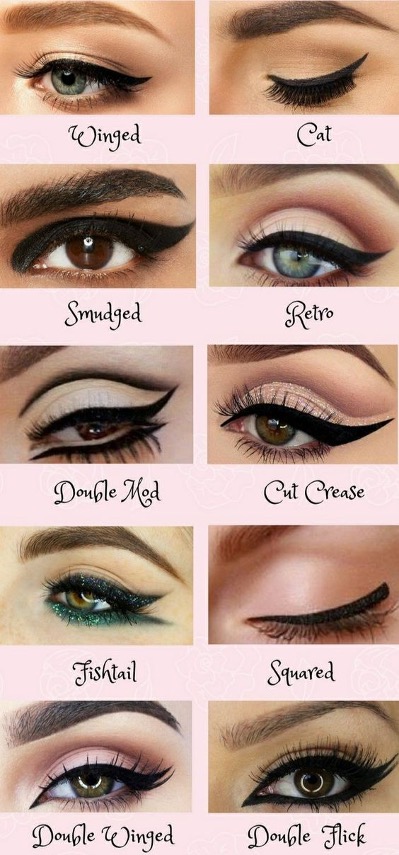
A winged liner will look fabulous on nearly every eye shape, although you will need to carefully consider the angle of the outer flick. Clients with almond-shaped eyes will be able to pull off nearly all eyeliner styles. When applying eyeliner to clients with hooded and monolid eyes, the trick here is to ensure that the eyeliner can be seen when the eye is open. If you can’t see the eyeliner when their eyes are open, then you will need to shift the placement higher or apply a thicker line. For clients with downturned eyes, you will want to focus on lifting the eyes. To do this, you will need to ensure the flick on the outer corner goes slightly upward to draw attention to the tip of the flick. If you do not get the correct angle for downturned eyes, this can make your client look tired or sad!
Watch the videos below for tips from our expert with regard to mastering eyeliner:
Eyeliner is one area of makeup that people tend to struggle with a lot. There are loads of resources online that can show you different ways to apply it. Some companies have even created winged liner stamps, stickers and stencils to help us out! In addition to eyeliner, there is a technique called ‘tightlining’.
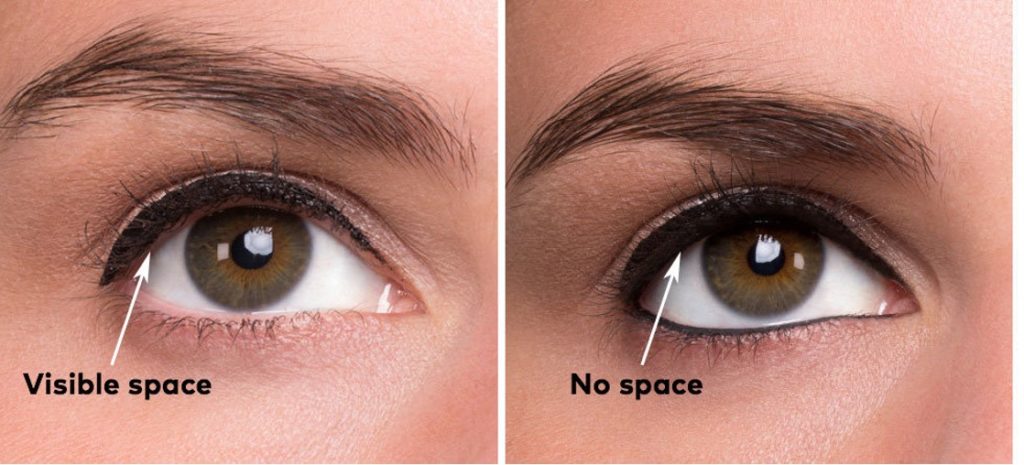
Key phrase | Tightlining: often called invisible eyeliner. It is achieved when eyeliner is applied not above or below the lash line – but [within the] inside of the upper lash line.
Tightlining is a useful technique to enhance and brighten your eyes. When you are tightlining clients, you might be a bit nervous at first because you will be applying the product to the inner rim of their eyes. When working with the eyes, go in with confidence and don’t be scared. You will likely make more mistakes if you are nervous or hesitant, so focus on the task at hand and go for it. See below for an example of tightlining:
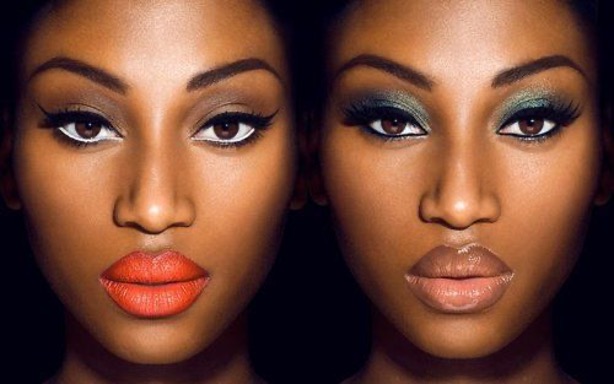
Rather than applying black to the waterline, many MUAs will apply white or a peachy colour to open up the eyes. Remember, darker tones sculpt and lighter tones highlight. See the differences below:
If you are interested in learning more about eyeliner application techniques, access the resources linked:
Mascara
Just like eyeliner, black mascara is the ‘OG’ of mascaras and is absolutely essential to have in your kit. Back in the 1980s, coloured mascara was on trend, and these days, you can get mascara in nearly every colour. Before you apply mascara, if your client has straight or downward-facing lashes, you might want to curl them first using a lash curler.
When applying mascara on clients, always use a disposable mascara wand and never double dip! If you need more product, then you will need to use another wand. When applying mascara, start from the base of the lashes and then wriggle up the lash. Most people think that most of the product needs to be added to the end of the lashes, but it is actually the base of the lash line which makes lashes appear fuller and longer.
You should never apply more than 2 to 3 coats of mascara; otherwise, the lashes will start clumping and will be quite heavy. Not only does this look terrible, but it will also be uncomfortable for your client. After you have applied mascara to the upper lash line, you will likely notice a bit of transfer to the lower lash line – this is completely normal and pretty handy. The transfer that naturally occurs means that half of the lower lash line is already done for you – great, right? Using the excess on your mascara wand or a light amount of mascara, apply to the lower lash line. Asking your client to look up when you are doing the lower lash line is really handy to help you get into where you need to.
See the below video tutorial on mascara application:
False lashes
If your client wants false lashes, you have the option of applying strip lashes or individuals. Applying lashes takes a bit of practice, and the main culprit of lashes that do not apply correctly is adhesive. The lash glue needs time to become sticky before you apply it to the lash, so never place it directly on the lash. If you do this, it is unlikely the lashes will stick. Instead, decant some lash glue onto your palette first, and while you are waiting for it to go sticky, you can trim the strip lash or start getting your individual lashes ready.
To apply false lashes, our expert recommends you do the following:
- Remove the lashes from the packaging with your tweezers
- If you are using strip lashes, hold them up to your client’s eyes with your client looking down at their knees to assess required length. Ensure your lash strip is not glued too closely to the inner rim, as this will be uncomfortable for your client when they blink (2-3mm gap)
- Trim the lash strip accordingly from the outer edge of the strip
- Decant your glue onto the lash palette and allow time to get sticky/tacky
- Apply glue to the lash and wait a moment (never blow on a lash for a client!)
- Place lash on the eyelid as close to the client’s natural lash line as possible
- Check your work and apply more glue if any of the lashes are lifting
- Use eyeliner to colour and blend lash strip
- Check that your client is comfortable and make adjustments as needed
Watch the below video to see our expert apply strip lashes.