6.4 Creating fans
The main difference between classic application and volume application is the use of fans. You can purchase pre-made fans, however learning how to make your own pro-made fans will up your lash game big time! Before we start looking at how to make fans and use volume lash techniques, let’s learn a little more about the types, techniques and what good/bad fans look like.
Pre-made fans will obviously save you a lot of time, but you will have to work with the curve and specifications of the fan cluster. Pre-made fans will usually have anywhere from 2 to 10 lashes, and they will be held together by a glue bond or a heat bond at the base of the fan. When you make your own custom fans, you will have a bit more flexibility in terms of selecting lengths and diameters, allowing you to mix them up to create tailored looks. The table below provides a comparative look at pro-made versus pre-made:
| Criteria | Pro-made | Pre-made (glue bond) | Pre-made (heat bond) |
|---|---|---|---|
| Damage to natural lashes | None | It can be damaging due to weight | Minimal |
| Skill level needed | Advanced | Intermediate | Intermediate |
| Application time | 3 to 5 hours | 2 to 3 hours | 2 to 3 hours |
You might be thinking that because pre-made fans take a significantly shorter amount of time, that they will be the better option. They may save time, but they can tend to cost 5 times more than making your own! Fan creation is an advanced technique but definitely one to master. There are many different fan types that you can create, ranging from super narrow to wide:
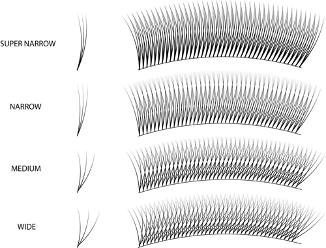
Wider fans can be excellent for clients with sparse lashes as they tend to be fluffier. If your client already has a lot of lashes, then you will tend to use more narrow fans. When making your own fans, there is a range of techniques that you can use. Let’s take a look at the most common:
| Technique | Overview |
| On-off | In this technique, you will remove your lashes and then re-attach them to the strip. You will then push them with your tweezers from left to right to fan them; once you have your desired fan, you just pick them up. When you pick them up, do not pick them up too high, or you will create a split base. |
| Push and pop | In this method, you will lift your group of lashes off the strip and then point them diagonally to the fanning dot (a sticky dot). Next, you will push the lashes at a 45° angle and release them. Finally, you will pick up the fan and pull it away from the glue dot, which will help to ensure the base is thin. |
| Side swipe | In this method, you will lift your lash group but ensure the lower third is still attached to the strip. Next, you will use your tweezers to scrape and push the lashes to the side. Once you have swiped the lashes to your desired fan width you can then pick them up and pull them sideways towards you. |
| Wriggle | This technique requires you to wriggle along the lash line to separate the lashes and create your fan. When using this technique, it is best to use L shape tweezers. For this technique to be successful, you must run your tweezers along the lash strip; in order to grip the lashes, you need to create the perfect fan. |
Below are some examples of good and bad fans:
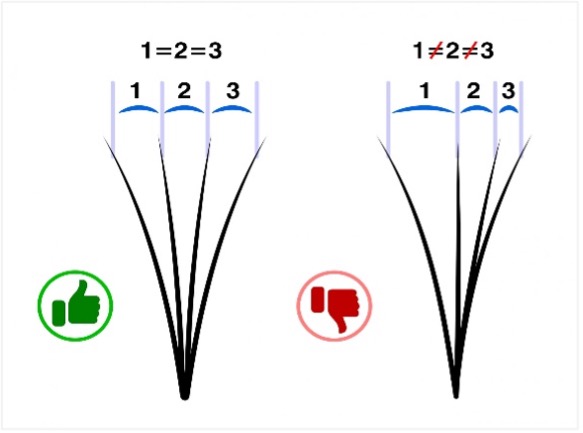

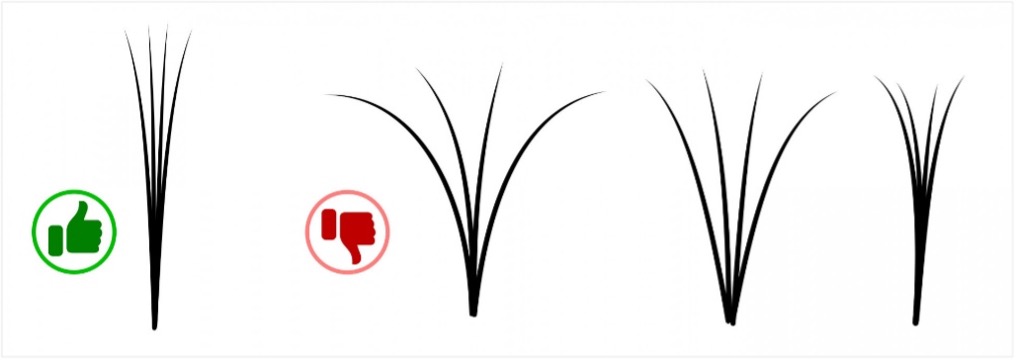
A ‘split base’ is a common problem with fans, and that is when the base of your fan splits. To correct this, you can pull the fan through the adhesive and release the tiniest amount of pressure on your tweezers, and the split lash will reconnect with the other extensions with the adhesive. Split bases are one of the top pet hates of all lash technicians! If a split base happens after application, it can cause irritation and will be very uncomfortable for your client. Neighbouring lashes can also get caught, and this can damage the natural lashes.
To learn how to make your own fans and what you need to do to fix a split base, watch the below AED videos:
Lash wrapping
When attaching fans to a client’s natural lash, you will utilise a technique known as ‘wrapping’. Lash wrapping is a term given to the natural tendency for the base of a fan to wrap or hug a natural lash due to adhesive being spread across a relatively wide base (compared with, for example, along the thin base of a single lash extension used in the classic technique).
While a fan will have a tendency to naturally wrap around a single natural lash, the technique does require some practice and, most importantly, some skill and patience. The application process itself requires you to bring the fan (dipped in adhesive) to the natural lash very slowly, so that in the final stages the adhesive acts to almost pull or gravitate toward the natural lash once held close enough. Once contact is made, a very subtle downward pressure is then required to encourage the individual lashes of the fan to wrap around (or hug) the natural lash, resulting in the below end result:
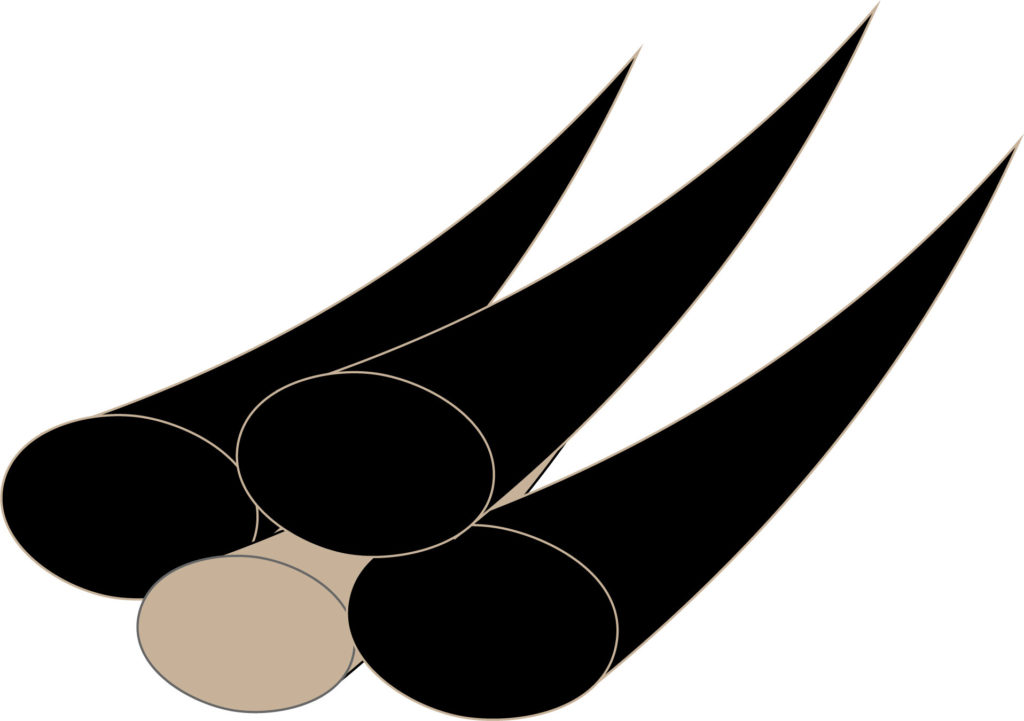
The increased surface area of adhesion of a fan also results in a much stronger bond with the natural lash than a classic lash. It is for this reason volume lashes (both Russian and mega) tend to have greater retention than classic lashes.
For some examples of how to best attach pre-made and pro-made fans, watch the videos linked:
Now that you have a better understanding of fans and how to create and attach them, it’s time to try it out for yourself!
Practical Activities
- For the next week, practice creating fans of all types from narrow to wide. Create 2D, 3D, 4D and 5D fans using all four methods detailed in the above video, Creating fans. You may find you prefer one method for creating 2D fans, and another for 5D. Or, you may naturally gravitate toward one method for creating all types of fans. This comes down to personal preference and whichever method/s you choose to utilise is completely up to you.
- One you are confident in creating fans, complete a set of 2D, 3D, 4D and 5D volume lashes on your mannequin head, practicing your wrapping technique. You will find that not every fan will wrap the practice lash, and some may glue on top similar to a classic lash. This is completely fine, you will not achieve a wrap on every lash, however you should attempt to wrap every fan.
- Intentionally split 6-8 bases and practice fixing a split base.