4.3 Electric file equipment
Electric nail files called e-drills or nail drills are a staple for your kit. Not only do they speed up the nail filing process, but they also help to protect your wrists and hands from repetitive strain injuries (RSI) caused by manual hand nail filing for hours on end. When starting to use an e-file, it can be a little daunting – after all, it is a powerful tool with high speeds and can cause significant damage if not used correctly. This is why we have dedicated an entire lesson to e-files so that you can learn everything there is to know to ensure you are confident and competent when filing your clients’ nails with an e-file.
Electric file equipment characteristics and use
E-files are super versatile and can be used to shape nails, buff nails, remove gel enhancements, tidy the cuticle and can even help to remove calluses! An e-file can pretty much do any repetitive movement task that you would usually do with manual tools. Before you begin using an e-file, you should always carefully read the manufacturers instructions and familiarise yourself with all of the attachments, speeds and settings.
Variable speed electric file
Most e-files will have a variable speed setting, and they will also usually have a direction setting. Knowing what speed to choose for each task come with practice, but as a general rule:
- Use a slower speed for natural nails or Gel nails
- Use a higher speed for acrylic nails
When determining the speed of an e-file, we must consider the ‘spin’, which is measured by RPM (rotations per minute) and the torque (the rotational power of the spin). A quality e-file will maintain the same speed and rotational power when it is spinning in the air, filing gel or filing acrylic.
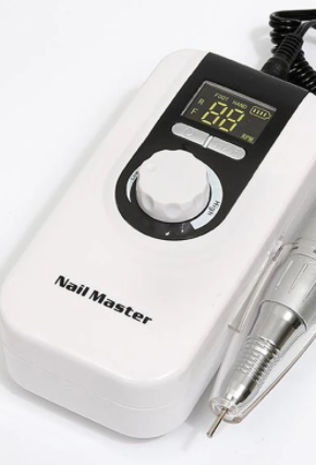
The Nail Drill in your kit has the following specifications:
- Speed: 0-30,000 RPM
- Smooth, low vibration, quiet operation
- Rotating dial to adjust speed with digital speed indication (LED screen)
- Forward and reverse rotation of drill bit
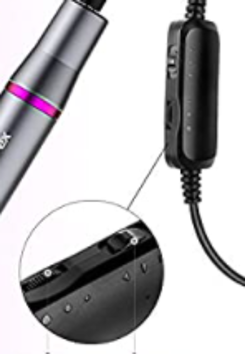
All e-files are different – some have buttons to adjust speed, whereas others have a scrolling dial or rotating dial, like the one you have been supplied. View the following images as examples:

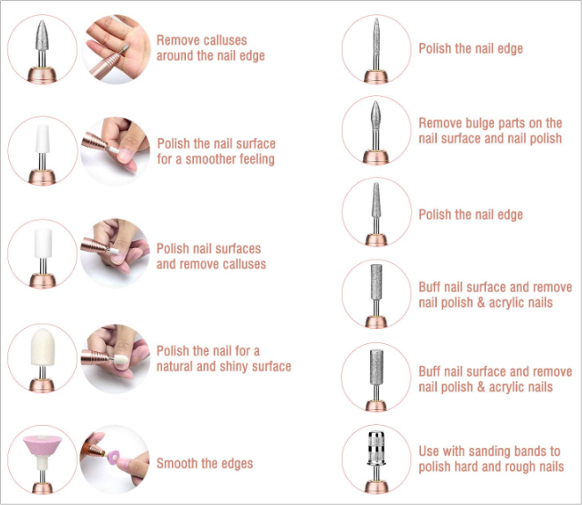
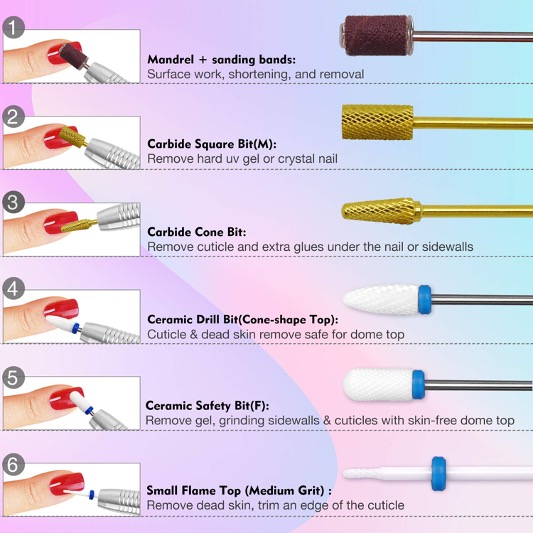
Burs or bits
E-drills come with a range of attachments called burs or drill bits that help to achieve specific tasks. At a general level, e-files will have:
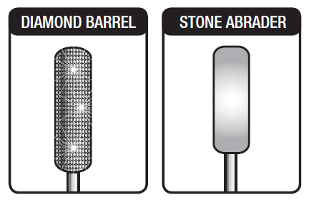
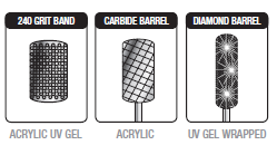
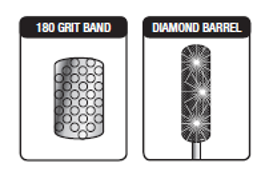
- Diamond bits: these come in fine medium and course grades and are the most versatile of all your file bits as they can be used on natural, UV gel nails and acrylic nails.
- Carbide bits: made from carbide metal these are only suitable for acrylic nails and UV gel nail removal. Carbide bits have small flutes (think small teeth) that essentially shave the nail.
- Ceramic drill bits: made from a Zirconia Ceramic material, these bits don’t heat up as much as the other drill bits and come in several grids such as medium coarse and fine course. Ceramic bits can also be cleaned and sterilised. These bits have larger flutes which can eat through gel and acrylic quicker than the Carbide bits, but due to this reason ceramic drill bits are more suitable for an experienced nail technician.
- Mandrel bits: mandrel bits are used with sanding bands of various grits.
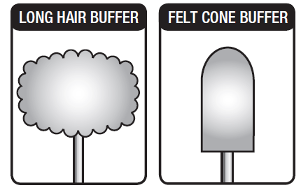
- Buffing bits: these bits are suitable for natural nails and will usually be made of felt.
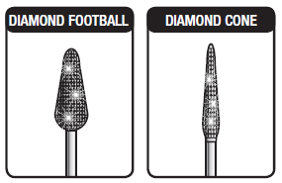
The images below outline the common types of drill bits with their uses with an overview and visual example:
To put all of this into perspective, the table below outlines a range of tasks that you will perform in your role with recommended drill speed and recommended drill bit:
| Task | Recommended | Recommended drill bit |
|---|---|---|
| Repairing a cracked nail | Low speed ranging from 3,500-6,000 RPM | Diamond |
| Prepping the natural nail for a Full Set | Low speed 1,200 – 2,000 RPM | A fine sanding band, medium to fine diamond, or a coarse silicone |
| Working on the natural nail removing cuticles | Low speed ranging from 2,500-6,000 RPM | Extra-fine diamond, extra-fine sanding band, or silicone |
| Backfills | Medium speed between 5,000-9,000 RPM | Diamond, carbide straight barrel, or specialized backfill. |
| Finishing a nail enhancement | Medium to high speed between 5,000-12,000 RPM. If working near the cuticle, lower to under 7,000 RPM | Medium barrel, diamond, or carbide; extra-fine diamond |
Did you know?
Electric files do not burn the nail. A tech controls the machine and determines how much pressure is applied to the surface of the nail. The rule for heat is: Pressure causes friction, the friction causes heat. If pressure is not applied to the surface of the nail, the nail will not get hot if Constant movement and light pressure is the best technique for minimising heat with all types of bits.
Electric file procedures
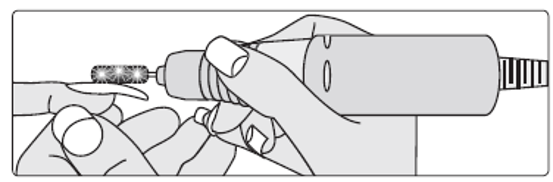
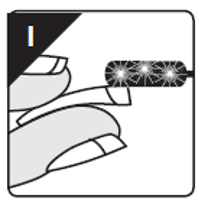
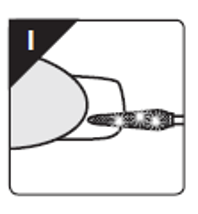
Now that you have an understanding of the drill speed and drill bits, we can now look at electric file procedures. When you are holding the hand piece of the drill, do so like you are holding a pencil. Take the time to get comfortable with your grip and manoeuvring as you practice using the drill. When using an e-file, always rest the little finger on the hand using the drill onto the hand you are using to hold the client’s nail. This helps to ensure the drill is steady and allows you to stay in control. For example:
The processes you use when e-filing depends on the type of drill you are using and the drill bits you have. As mentioned, you must always review the manufacturers’ instructions before using the drill. Let’s take a look at some general procedures for natural nails, nail enhancements and pedicures.
Working with natural nails
When working with natural nails, you must never use carbide tools or any tools that are very coarse. You must take great care when you are working with the natural nail with an e-file because you can quickly damage the nail if you do not use the drill correctly. The table below outlines a range of natural nail preparation tasks and recommended procedures:
Removing nail ridges
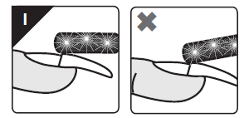
When removing ridges, you can use a diamond or stone barrel drill bit at a slow speed. You should move from one side to the other and then lift off and repeat the process to smooth out ridges. Never move side to side as this can cause friction which = heat.
Reducing nail length
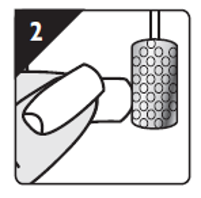
To reduce nail length, you need to use the mandrel attachment with a 240 grit band. To reduce the length, hold the drill bit vertically against the free edge. You should never shape with an e-file; it’s best to use a hand file!

Buffing the nail plate
Buffing bits can be used at slow speeds, and you may want to use a buffing cream, paste or cuticle oil. You should move over the nail in circular motions and be sure to keep pressure light to prevent heat.
Cleaning under the free edge
To clean under the free edge, you can use a slow to medium speed and a diamond football or diamond cone. Use light pressure to ensure you do not damage the nail.
If you would like to learn more about e-filing natural nails, watch the videos linked:
Nail enhancements
As part of the nail enhancement process, you will prepare the natural nail the same way you would for a basic manicure. Extra care must be taken to remove dead skin from the nail plate as well as the cuticle and sidewall, as this is the most common cause for nail lifting. The table below outlines common tasks for nail extensions and how you should use your e-file:
Removing nail ridges
When removing ridges, you can use a diamond or stone barrel drill bit at a slow speed. You should move from one side to the other and then lift off and repeat the process to smooth out ridges. Never move side to side as this can cause friction which = heat.
Blending the seam
You always blend the seam of an extension tip with a diamond barrel tool as you will be in contact with the natural nail. You must use a slow speed and move across the seam in one direction. The drill should be parallel to the nail, not at an angle.
Reducing length
You can use a mandrel with 180 grit to reduce the length of nails and even nail lengths out. Just like reducing length with natural nails, hold the tool vertically. You should use firm pressure and move across the nail in a straight line.
Finishing the top surface
When finishing the top surface of nails, you can use a 240 grit sanding band on both acrylic and gel nails. For acrylics only, you may also use a carbide barrel. When filing this area, you should do so in three zones – the cuticle, the centre and the tip/free edge. Whenever you are near the cuticle, you must use a slow speed. Always move from one side to the other and then lift off – never move side to side as this can cause friction which = heat.
Filing under the free edge
To clean under the free edge, you can use a slow to medium speed and a diamond football or diamond cone. Use light pressure to ensure you do not damage the nail. Never use a carbide tool – even on acrylics, as this could cut the client!
Buffing the nail
Buffing bits can be used at slow speeds, and this is part of the finishing stage. Buffing tools can build heat quickly, so use on slow speeds.

Removing lifted product
For acrylic nails, you can use the top edge of a carbide barrel or a medium diamond barrel. For gel nails, you can use the cutting edge of a medium diamond barrel. You angle the tool to cut a line just behind the lifted area, and the area will usually flick off. You should never file directly on top of a lifter area as this can force more product to lift. Continue this process until the product is gone.
Removing UV gel nail extensions
Gel nails cannot be soaked off, so they must be removed by filing away the product leaving a very thin gel layer. Using an e-file for this can make this process very quick and is less harmful to natural nails. You can use a 180 grit sanding band or a diamond barrel to do this. You should use a medium speed and be very careful not to file the natural nail plate.
If you would like to learn more about e-filing nail extensions, watch the videos linked:
In some e-file kits, there may be emery stone cones or a stone abrader that can be used to remove any hard skin. If you choose to use these drill bits, you should use a slow to medium speed and work in circles. Remember to lift the tool regularly to prevent a build-up of heat. When filing the actual nail, it is always better to use a hand file on the feet.
Safety, maintenance and cleaning
Electric files are completely safe, so long as they are used properly. Mastering techniques on an electric file can help reduce strain on your wrists and will also help you to complete your services more quickly. When working with hand files and electric files, you must always ensure that you do not damage the natural nail plate! In addition to this, you also need to keep yourself safe when using electric files.
Given that electric files speed up the filing process, the dust from the nails can be a cause for concern for nail technicians. As such, you must ensure that you have adequate ventilation and that you wear appropriate personal protective equipment (PPE). PPE that you must wear when using electric files include:
- Gloves to protect your hands
- Safety goggles or glasses to protect your eyes
- A mask to protect your lungs
In addition to PPE, you must ensure that you are regularly clean and maintain your e-file. This not only helps to ensure the life of your e-file is longer, but it keeps your clients safe! You must disinfect your tools and uphold hygiene standards.
As you saw in the videos, e-files produce lots of dust, so it is important that you have some level of extraction to keep you and your clients safe. Because you are exposed to lots of chemicals, products, and dust particles each day, it is really important that you wear PPE to protect yourself. Not to mention the importance PPE has in protecting you from contracting any possible skin to skin diseases. Always remember to follow infection control guidelines and state or territory Occupational Workplace Health and Safety regulations. As mentioned in the first video, once you become allergic to nail products, there really is no going back as it gets worse. So while wearing PPE might be a bit uncomfortable at first, it is critical if you want a long term career in the nail industry.