3.7 Lash application processes
Now that you have the basic underpinning knowledge of all things eyes and lashes, we can now look at lash application processes in more detail. In this section, you will learn more about how you can:
- Develop lash maps
- Remove lashes prior to application
- Apply lashes
- Infill lashes
We will focus on the basic theories underpinning each of the above processes in this section and in the skills hub module; you will see further demonstrations and will be able to practice these essential skills yourself!
Mapping lashes
Have you ever heard the quote ‘if you fail to plan, you plan to fail’? This sentiment rings true as a lash technician because there are so many factors you need to consider when applying sets of lashes. Once you have had the client consultation and you have determined the applicable lash style, the next step is to complete a lash map to plan out how you will achieve the desired look.
Key phrase | Lash map: these are your plan of application which records the lengths and segments before you begin treatment. Lash mapping allows you to consider the shape and features of each eye individually to ensure you create a symmetrical look. The lash map documents which lengths will be placed where, in accordance with the lash style you have selected.
Lash mapping is critical when you are starting out as a lash technician as they serve as your ‘game plan’ and will guide you through the lash application process. You were unknowingly introduced to lash maps when we looked at the different lash styles! These days, there are so many lash maps available on the market, and you can purchase readymade guides, although having an understanding of how to create your own is important for when you are wanting to create bespoke looks for your clients.
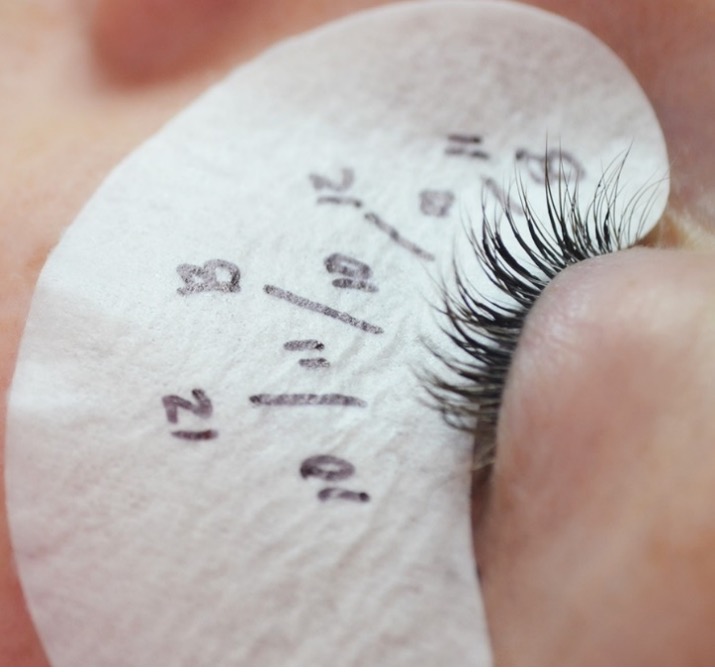
The same style can look completely different on different clients because lash extensions rely on the length, diameter, and curls of the clients natural lash. By using a lash map, you can customise the standard lash styles to meet the unique needs of your client. To create your own lash map, you will place an eye pad under the clients eye. From there, you will start by drawing your ‘frame’, which will be lines indicating the outer, inner, and centre parameters. From there, you may need to add in additional lines, depending on the sort of look you are trying to achieve. Once your lines are drawn, the next step is to indicate which lash lengths will be placed in which ‘zone’ or ‘segment’. An example has been provided below:
When you are developing your lash maps, consider the following tips for mapping different eye shapes:
- Close-set eyes should have longer lashes on the outer corners to make the eyes appear wider
- Wide-set eyes should have more length in the middle of the lash line longer in the middle
- Almond-shaped eyes should be at their longest, about two-thirds of the way along the eye, before tapering to a shorter length
- Protruding or prominent eyes, you should avoid very long lashes and opt for shorter and straighter length extensions to achieve a softer look
- Adding longer lashes to the outer corners will create a cat eye effect
- Adding longer eyelashes in the middle of the lash line will create a doll eye effect
If you are interested in learning more about lash mapping tips, tricks and techniques, watch the videos linked:
As a reference, below are general lash maps for common styles:

As you practice your lash maps, be sure to keep a record of styles that have been successful for certain eye shapes. Practice makes perfect, so be sure to refine your technique and be mindful of the impact a client’s natural eye shape will have.
Lash direction and uniformity
Lash maps can help you to create a plan to achieve uniformity, but to actually achieve uniformity, it is all in the technique! Your client’s lashes will naturally grow in a specific direction. Earlier in the course, we looked at the different types of lash curls, and you will soon come to realise that natural lashes have a mind of their own and don’t necessarily all point in the same direction. It’s our job as lash technicians to create uniformity and direction within our sets.
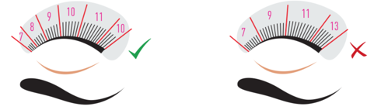
When placing the eyelash extensions onto the natural lash, it’s best to aim for the extensions to be placed at a 90-degree angle (perpendicular) to the curvature of the eyelid, and sometimes that means we need to ignore the direction of the natural lashes. To put this into perspective, review the following example:

As you can see in the example, if you were to follow the natural lash (image on the right), the overall result would look wobbly and non-uniformed. Creating uniformity comes with practice, and it is all about the angles!
If you would like to learn more about creating uniformity and controlling lash direction, watch the videos linked:
Graduation of lash lengths
As you have learned already with the different lash styles, you will never use one length of lashes on a client. This makes sense because our natural lashes vary in length, so for a natural effect, you will use a range of lash lengths. The important thing to remember is that you should never ‘jump’ lash lengths otherwise, lashes will look staggered. To put this into perspective, review the diagram:
As you can see in the example, the correct graduation will go up and down one length. There are times where you can go from, say a 13 on the outer to an 11, and this will depend on your client’s natural length and the look you are trying to achieve. You can also blend lashes by overlapping lengths within each section. This helps to ensure there is not obvious graduation between each zone.
If you are interested in learning more, watch the video linked:
Symmetry of work
Have you ever had a haircut where one side is longer than the other? It can be really annoying! The same is true for lash extensions. Work that is not symmetrical can be very noticeable to the client and can be difficult to fix if the work is very asymmetrical (not the same). To ensure your work is symmetrical, it is always good practice to work on both eyes as you go and follow a sequence. By working on both eyes at the same time, it can help you to ensure your work is symmetrical, and it is also handy if your client has to leave their appointment early for any reason! Using a lash mirror or dental mirror to regularly check your work as you are going is also an excellent way to ensure your work is symmetrical.
It is important to remember that some of your clients will come to you with asymmetrical eye shapes and lashes. Skilled lash technicians will know how to correct any asymmetry through strategic placements of lashes and by using the correct direction and graduation. Review the example below:
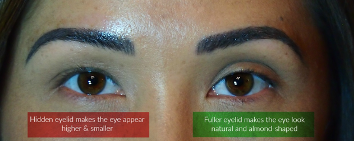
If the lash technician used the same styling and lash graduation on each eye, the left eye would look more open in comparison to the right eye. To correct this asymmetry, you would get the client to look straight at you and then mark where the lashes need to sit in order to correct the variance. From there, you can work out where the lengths will need to be different and where across the lash line you will need to change lengths. Correcting natural asymmetry is an advanced skill, but it is definitely a skill you should be aiming to master as many clients will have eyes that are different shapes and sizes. An example of the lash mapping used to achieve symmetry has been provided:
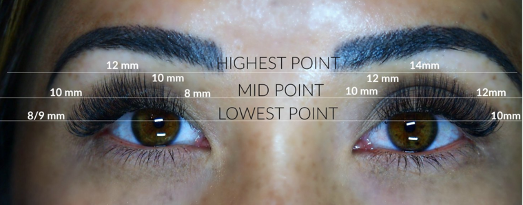
Using your lash map as a guide is essential for symmetrical work and for planning how you will try and correct any asymmetrical eye shapes. If you were to ‘freestyle’ the lash application, it can turn into a hot mess very quickly! You may also consider framing your work. This means starting with the outer segments, then the centre segment and then the remaining segment.
If you are interested in learning more, watch the video linked:
Lash removal prior to service
Once you have your lash map, you can commence your service! If your client comes to you with their natural lashes, then you are good to go, but what happens if your client comes to you with extensions in? If this happens, you will need to remove damaged, sparse, or grown out eyelash extensions before you can commence. In brief, the lash removal process steps are:
- Confirm with client eyelash extensions removal needs
- Apply eye patches to protect the lower lid and bottom lashes
- Apply product remover to eyelash extensions according to manufacturer instructions
- Remove eyelash extensions to avoid damage to natural lashes and client discomfort
- Apply aftercare product as required
You will learn more about lash removal techniques in the skills hub, but for now, you may want to watch the videos linked to get a general understanding:
Standard lash application
Once damaged, sparse, or grown out eyelash extensions have been removed, you will be ready to start applying. Regardless of the application technique or lash style you are using, you will follow the same steps for each application service:
- Apply medical tape, or lint-free eye patches to lower lid and bottom lashes.
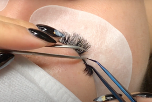
- Use tweezers to isolate natural lashes, and glue individual eyelash extensions avoiding contact with the surrounding skin.
- Monitor and adjust application of individual extensions to ensure correct positioning, even distribution and thickness according to client needs.
- Complete application of eyelash extensions according to treatment plan.
- Remove lint free eye gel patches, or adhesive tape, gently and to avoid discomfort to client.
Applying tape and eye pads (patches) to the eye can be a little bit fiddly at first, but the more you practice the easier it will get. There are a range of application techniques you can use to apply tape and patches, and you will likely find your own style of application. The traditional method is as follows:
- Ask your client not to speak while you are applying the pads
- Ask the client to look up
- Balance the pad at the edge of the lower lid waterline and press down along the lash line
- Be sure to always keep around 2 to 3 mm away from the clients’ water line
- Ask the client to close their eyes and confirm that the pad placement is comfortable
Poorly placed eye pads may result in bruising, irritation, swelling or blood shot eyes. Many lash technicians combine eye pads with tape, but should you choose to do this, be incredibly careful with your placement and the type of tape you use. Incorrect tape use may lead to discomfort, pain, and even expose the eyes to fumes which can cause chemical burn or a range of contra-actions. In addition to correct placement, the quality of the eye pads you are using is important. Some of the lower-priced eye pads can be really sticky and scratchy for clients. Eye pads need to be comfortable for the client and should not hurt them while in place or when you need to remove them. The table below outlines common problems you may have with eye pads and how to overcome them:
| Problem | Likely causes | Solutions |
|---|---|---|
| The eye pad won’t stay put! | 1. Lower eyelashes are pushing the eye pad up 2. The client has protruding lower eyelids 3. Oily skin 4. Traces of makeup | 1. Choose the appropriate type of eye pads for each type of eyelid; some may need to be thinner or thicker 2. Properly cleanse the eyes before applying eye pads |
| Your eye pad is touching the eye or the gel in the pad begins to swell | 1. The eye pad is initially applied too close to the eye waterline 2. The clients eyelid shape does not suite the curvature of the eye pad | 1. When you place your eye pad, ensure you can clearly see the base of the lower lashes when lifting up your clients’ closed upper eyelid 2. Constantly check the eye pad position during the entire process 3. If the pad begins to swell, remove it and re-apply a fresh pad |
| Your eye pad slides down, and the lower eyelashes stick out. | 1. Incorrectly applied eye pad 2. Air pockets between skin and the pad 3. Too much contact with isolation tweezers | 1. Take your time when applying patches 2. Pay attention to your isolation tweezers and ensure the tips do not touch the eye pad 3. Check the eye pads regularly |
Isolation
When you have confirmed the position of the eye pad and have checked with your client that it is comfortable, you can begin recording your lash map and setting up your treatment field. Next, you will begin your lash application. A fundamental technique that you will likely spend countless hours practising is lash isolation.
Key phrase | Isolation: the process of separating a single natural lash from the rest of the lashes on the lash line using a tweezer (isolation tweezers) in your non-dominant hand.
Because lash isolation occurs using your non-dominant hand, it is a fine motor skill that does not come naturally to many of us – unless of course, you are ambidextrous! Isolation is probably the most important factor when it comes to creating a perfect set of lashes. If your isolation and placement aren’t done correctly, you can cause extreme damage to your client’s natural lashes, not to mention the damage to your reputation! Common isolation techniques that you can use include:
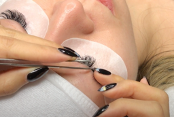
Dual-tweezer isolation
Use both your isolation tweezers AND your pickup tweezers (in your dominant hand) until you are comfortable with one hand
Isolate using your fingers
If your client has long lashes or extensions already, you may be able to use your fingers to assist you with the isolation
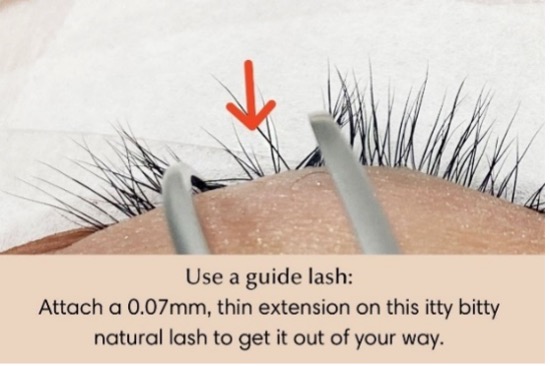
Use a guide lash
Attach a 0.07mm thick extension on the natural lash if you are having issues with little natural lashes
Working through layers
Work your way vertically down through the lash layers
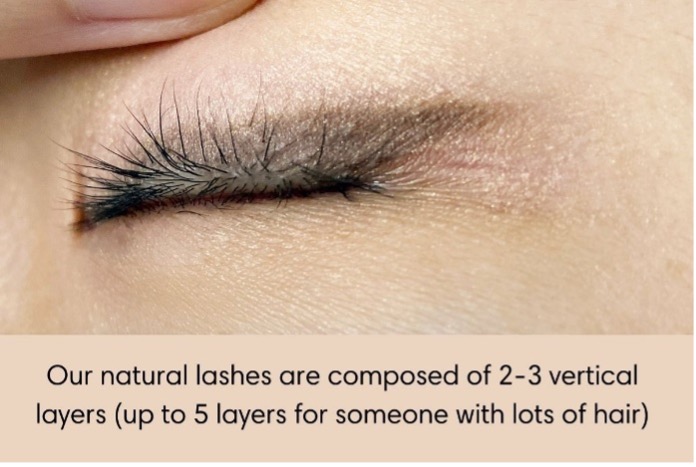
In addition to isolating individual lashes, you can also isolate lashes by layer. Isolating by layer can be very useful when applying volume lashes to help you with lash placement.
To learn more about isolating individual lashes and lash layers, watch the videos linked:
The more you practice your isolation, the easier it will get! When you are first starting out, it is best to begin with mastering the classic lash technique for a natural style. Once you are confident with the natural lash style, you can then move onto the other lash styles using the classic lash technique. By the time you can achieve all the lash styles with the classic technique, you will be ready to tackle volume lashes! As children, we all learned to walk before we could run. The same approach needs to be used with your lash extension practice. If you jump into more advanced techniques straight away, you may develop poor habits which will be difficult to unlearn!
Infills
The infill is where old extensions that have either grown out or have twisted, are removed and new extensions are applied to take the set back to fullness. If a client wishes to maintain their extensions, then they have the option to have an infill every 2 to 3 weeks. The price of infill is generally a little more than half the price of a full set, and you can have the option to charge differently for 2 week, 3 week and 4 week infills. Most lash technicians will charge for a full set for anything after 4 weeks (28 days and over) because any lashes left on the eyes will most likely need to be replaced due to the growth of the natural lashes.
A full new set of eyelash extensions always lasts longer than repeated infills. The reason being, a full set will have fresh adhesive, whereas infills will always a mixture of new and old extensions, and some of the adhesive will have broken down over time. To protect yourself, you should ensure that all of your clients return for infills within three weeks, and they must be returning with at least 50% of the set remaining to be classed as an infill. You should ensure that you have clear policies in place for what constitutes a refill and what constitutes the need for a fresh new set.
If clients arrive with just a few extensions remaining, then a full set will be needed due to the amount of product you need to reapply and the time it will take to restore their lashes to their former glory. It is good practice to ask your clients to inform you prior to their appointment if they haven’t had good retention so you can make sure you have enough time to complete a full set.
Key phrase | Retention: refers to the length of time the lash extensions remain bonded with the natural lash between fills. Good retention means that the lashes have held, and bad retention means lashes have fallen out.
You will see that your client’s retention patterns will vary from week to week, and this can depend on so many factors, including, but not limited to:
- Client health
- Menstrual cycles lifestyle
- The weather
- The season
- Nutritional supplements
It will be up to you and your client to understand when they need to return for infills as every client will have different retention – some may need to come at two weeks, some at three weeks and some may even need to return weekly. If your client has hay fever, rubs their eyes or doesn’t care for their extensions correctly, then they will likely need infills on a more regular basis.
To help build your business, for regular clients, you can be a bit more lenient on their infill schedule so long as they are consistent and on top of their lash maintenance. With new clients, it is important to set the standard right from the beginning so they understand the importance of maintaining their lashes and scheduling their infills within a reasonable timeframe. When it comes to infilling another lash technician’s, you should never do so unless you know or trust the other technicians work. The reason for this is that you do not want to get the blame for poor quality work or retention, and it can actually make your life a lot harder trying to gap-fill somebody else’s styling. Unfortunately, there are a lot of lash technicians out there with extremely poor quality of work and technicians that don’t teach their clients the proper aftercare, resulting in poor hygiene. If you have a client that is a victim of a poor lash application, you can offer to remove the existing extensions and apply a new set.
If you would like to learn more about infilling lashes, watch the videos linked:
During the infill appointment or even when completing a new set, there may be times when you will need to cap or stack lashes.
Key phrase | Capping & stacking lashes: Capping is where you overlap a lash with another lash and is excellent for creating symmetry when a natural lash is shorter than neighbouring lashes. Stacking is a technique where you double up 2 lash extensions with varying lengths and diameters to get a wispier look.
Capping and stacking are more advanced techniques that will up your lash game. Once you have mastered a classic lash application, you should begin practising capping and stacking techniques.
If you are interested in seeing how it’s done, watch the videos linked: