3.3 Lash extensions 101
In simple terms, eyelash extensions are a cosmetic application of synthetic hairlike fibres or real hair/fur fibres used to enhance the length, curl, fullness, and thickness of natural eyelashes. Lash extensions are suitable for all genders and we recommend not applying lash extensions to anyone under the age of 16. There may sometime be exceptions to this age limit, depending on the context and whether parental permission is granted. It is important to note that even with parental permission, your insurance may not cover clients under a specific age, so be sure to check you are covered before proceed with these services.
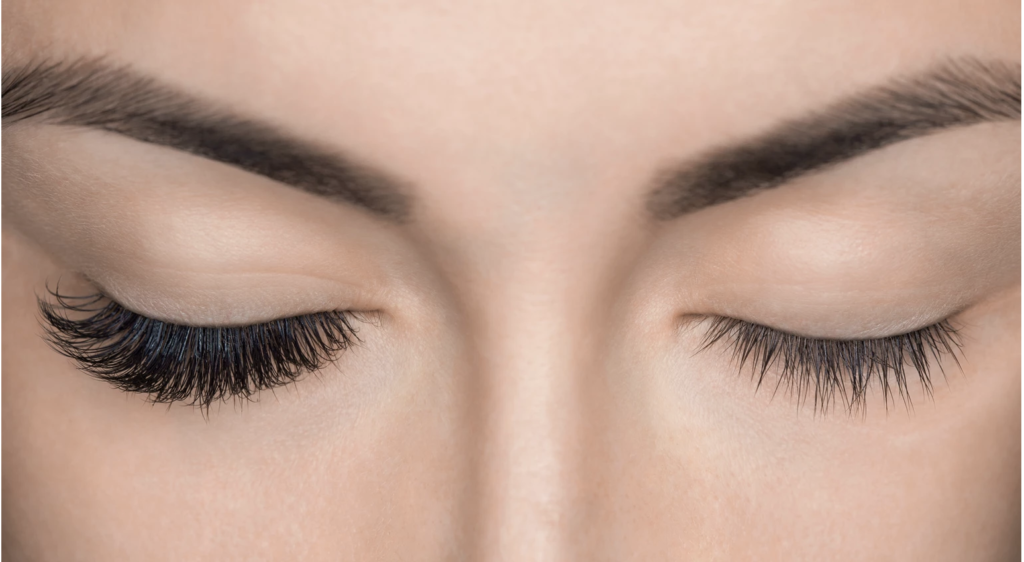
There are so many factors to consider when selecting the perfect lashes for your client. Having a solid understanding of lash types, specifications, and differences is critical when determining which style and lash are most suitable.
Lash types
Eyelash extensions can be made out of a range of materials including synthetic materials, fox hair, horsehair, and human hair. When we think about lash extensions, they will generally fall into two categories – real hair or synthetic. Synthetic lashes are made from polished acrylic materials whereas real hair extensions are made with exactly that – the real thing! Many lash technicians opt for synthetic lashes over real hair for the following reasons:
- Animals such as fox and mink are inhumanely farmed so that their fur can be extracted for our own vanity
- Any form of real hair can cause reactions when placed near the eye area
- Real hair can also lose its curl very easily and look “frazzled” due to the fact that it’s a real product
Real hair is more expensive which makes the service more expensive for our clients
The ethical issues with animal cruelty is also an important factor for many of our clients. Therefore, many lash technicians will opt for synthetic lashes over real lashes to not endorse the fur trade. Expanding on from real and synthetic, lashes also come in a range of types, including mink, silk and flat (or ellipsis[OK1] ). Many mink and silk lashes available today are made using PBT (polybutylene terephthalate) fibres. Put simply, PBT is a material that has a plastic substance and can be easily shaped, making it a perfect choice for the range of curls we need as lash technicians. PBT is also found in toothbrushes, makeup brushes and clothing. For mink and silk lashes that are synthetic, they will usually be labelled as ‘faux’, meaning not the real thing. You can source real mink and silk lashes; however, these are usually very expensive, and of course, there are issues with the sourcing of such products.
Let’s take a look at common types of lash extensions in more detail:
| Lash type | Overview |
| Synthetic | Synthetic lashes are widely used as they are the strongest of all lashes and a perfect for clients who have healthy, dense lashes of their own. Synthetic lashes are made from polished acrylic material and tend to be shinier and glossier than mink or silk lashes. Given synthetic lashes tend to be heavier than mink and silk lashes, they tend not to have as much longevity after application. |
| Mink | Faux mink lashes are extensions made with PBT that replicate the look of real mink lashes. They are usually very fine, soft and silky, and they tend to not lose the curl, even when exposed to moisture. In contrast, real fur mink lashes will usually go straight after contact with moisture. Given mink lashes are very fine, the lash application process tends to be longer as more lashes are needed. In addition to looking gorgeous on, mink lashes also have increased wear time due to them being so light and fine. |
| Silk | Silk lashes are perfect when you have clients who want a dramatic set, classic lashes and are a popular choice for brides. They are similar to mink lashes; however, there is a difference in the way they taper. Taper means the thickness of the lash from the thickest part to the thinnest. Mink lashes tend to taper at the end; third, whereas silk lashes taper two thirds down. Silk lashes will last longer than synthetic lashes and can be more hardwearing than mink lashes. |
| Flat/ cashmere | The lash industry is continually evolving, so you must stay updated with the latest trends and techniques to ensure you are giving the best possible services to your clients. In early 2015, the lash industry saw an amazing new type of lash – the Flat Lash (also known as an ellipse lash or cashmere lash). This was the answer for those clients that could not support the weight of a thicker lash but wanted a thicker darker look. This lash has a flat shape that creates a more dramatic look and can be used in classic lash styles, volume lash styles and hybrid lash styles. |
When you are stocking up your kit, always double-check your suppliers’ product information to ensure that there are no nasty surprises! You must always purchase from trusted suppliers as the quality of lashes can vary a lot, and if an offer or price seems too good to be true – it usually is.
It is important to note that there is some confusion over the branding of synthetic lashes, which can be labelled as either silk or mink. When synthetic lashes are made by the manufacturer and then sent to suppliers for them to retail, it is usually up to the supplier to decide what to call them. When determining the type of lash, the supplier will assess the lashes based on their weight and how glossy or matte the lashes are. A glossier lash tends to be labelled as silk and a more matt labelled as mink – but this is not always the case. It might be a bit of trial and error until you find the perfect lash types and suppliers for your clients. Try not to let the labelling put you off – look at reviews, photos and contact the supplier directly if needed.
If you would like to learn more about lash types and materials, access the links provided:
Building on the types of lashes available, eyelash extensions also come in a variety of curls, thickness, lengths, and colours, so there is a lash style to suit every client! Let’s look at lash style basics and a range of terms you will need to be familiar with.
Curl type
The lash curl type, also known as the ‘bend’, refers to a curl curve, which can vary from an almost straight curve to a dramatic curve. Curl types are categorised using alphabetical references, where a letter acts as the ‘code’ for categorising the type of curl. The table below provides an overview of the most common curl types you need to be familiar with:
J curl
J curl lashes are rarely used these days, as they are the straightest lash style. Many of your clients are likely coming to you for volume and length, so a J curl would not be suitable as it is too flat. However, for clients who are looking for a ‘barely there’ enhancement, a J curl would be a perfect choice!

B curl
B curl lashes are a step beyond J curl lashes, allowing for a natural effect with more of a curve. These are an extremely popular curl for clients who are mature, want a natural look or have a hooded eye shape. B curl lashes can be perfect for clients who have naturally straight lashes and want a look similar to the curl you would achieve using a lash curler.

C curl
The C curl is the most popular curl and an absolute staple to have in your kit! The curvature in a C curl allows for an open eye effect without looking too dramatic or unnatural. For clients who want a curl that can be suitable for daytime wear and also a night on the town, the C curl provides the perfect balance.

CC curl
As the ‘coding’ might suggest, the CC curl is similar to the C curl, with a touch more curve! This is perfect for clients who want more curl than a C curl offers but less curl than a D curl. The CC curl is ideal for both classic and volume applications.

D curl
With a distinct upward curvature, a D curl can open up a client’s eyes, provide a dramatic lift, and create a visible lash line. The D curl is becoming increasingly popular as it adds glamour and is particularly useful to achieve that celebrity look. Because this curl is so dramatic, it is essential to note that a D curl can look unnatural, so if your client wants a natural lash, give this curl a miss. Due to the curl’s nature, these can be difficult to work with, and it can be challenging to maintain uniformity. D curl lashes tend to not last as long as the J to CC curl types, so you will need to discuss this with your client and consider this when conducting your lash map.

L and/or L+ curl
As you can see, an L curl looks like a backwards ‘L’ where there is a flat base that then flows out into a curve. These are an excellent option for clients with very straight natural lashes, hooded eyes, or natural lashes slope at a downward angle. The benefit of the L curl’s flat base is that the extension can be attached to the natural lash, allowing for a stronger bond and a natural-looking lift effect. The L+ is a step above the L curl and provides a more dramatic lift, resembling the effect you would achieve from a C curl – but with a flat base.

U curl
If you have a client who wants to have their Kardashian or Beyoncé moment, then a U curl could be an option. It is the curliest extension type and is an extreme version of the D curl. Given the extreme curvature, this curl type is overly dramatic and may cause irritation as the lashes tend to curve back on themselves. A dramatic look can be achieved using the D curl, so this may be a more suitable alternative, especially if irritation is a concern.

The curls we have covered are not exhaustive but should provide you with a good starting point to get your head around the lash curl categories!
If you would like to learn more about lash curls and factors to consider when selecting the perfect curl, access the articles linked:
Curl types are generally similar across suppliers; however, there might be subtle differences. As an example, some suppliers categorise CC curls as D curls or U curls as DD curls and vice versa. Given the disparity in categories, it is important to do your research and clarify curl types with your supplier before stocking up your kit. It is also important to note that curls can be mixed in amongst a set to create bespoke effects; this is an advanced technique that will be taught later in this training.
Lash length
Now that you have a solid understanding of the lash curl types, the next factors to consider are lash length and diameter (lash thickness). Eyelash Extensions come in various lengths, and they are always measured in millimetres (mm). The shortest length most commonly used is 7mm, with the most extended length usually being 14mm. There are lashes on the market that extend longer than 14mm, but these will cause extreme damage to most of your clients. As such, it is recommended that you never go beyond 14mm.
Fun fact: the longest eyelash measures 12.40 cm (4.88 in) and has grown on You Jianxia’s (China) upper lid. The eyelash was measured in Changzhou, Jiangsu, China, on 28 June 2016.

When determining the correct lash length, a general rule to follow is the ‘3mm rule’, meaning a lash is no more than 3mm longer than the client’s natural lash. Natural lashes can generally hold up to 20% more length. If you select lashes that are too long, this may decrease retention or cause breakage – which are two outcomes you will want to avoid! You may have clients coming to you wanting super long lashes, but it is often better to opt for volume to achieve the desired look rather than using longer lashes which may compromise the integrity of the natural lash.
It is also important to remember that you will likely select lashes of varying lengths depending on the lash style you are trying to achieve. For example, you might use shorter lashes near the eye’s inner corner and have a gradual increase in length toward the outer corner. Depending on the style you are going for, you may use a different combination altogether! We will cover this in more detail when we look at lash maps.
Below is our very first AED video tutorial, which will discuss and demonstrate how to determine the perfect lash length for your clients.
Lash diameter
There is only so much weight that our natural lashes can hold. If you have ever worn a pair of heavy strip lashes, you will know just how uncomfortable a dense pair of lashes can feel. While a heavy set of temporary strip lashes might be ok for one night, lash extensions that are too heavy or long can cause a range of problems, including damage to the lash follicle, contra-actions and dissatisfied clients! Eyelashes falling out might have been the ‘in trend’ in Medieval times, but it is absolutely not acceptable these days and will be a quick way to damage your reputation in the industry. The key to selecting the correct lash is to find the perfect balance between length and weight to ensure the client’s natural lashes are protected while achieving their desired look.
To ensure we are applying lashes safely, we must be mindful of our extensions’ total weight and how this will impact the client. What can sometimes be confusing when you start out selecting lashes is that they are measured in diameter only and not weight. The reason for this is that the weight will vary, depending on the length of the extension. Additionally, there is no way that you can physically ‘weigh’ your client’s lashes to determine the weight of their natural lashes. Just like determining lash length, the best way to select an appropriate lash diameter is to compare the extension with the client’s natural lash.
Lash diameters range anywhere from 0.03mm to 0.30mm. To put this into perspective, look at the example below and see if you can determine which lash diameter would be most suitable for this client – 0.20mm, 0.15mm, 0.10mm, 0.07mm or 0.03mm?
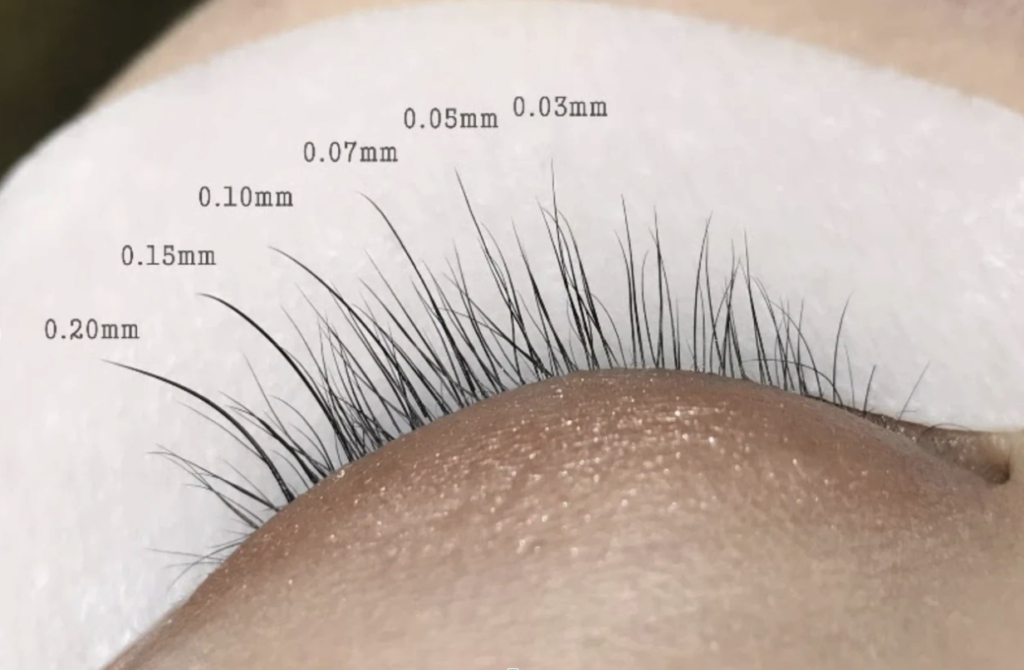
When you look closely, you can see that 0.03mm and 0.05mm lashes blend really well into the client’s lashes, and you can barely tell that they are extensions (these lashes are significantly lighter and designed for the creation of ‘fans’). The 0.07mm and 0.10mm lashes are more prominent, with the 0.15mm lash appearing even more striking. Due to the weight of a 0.15mm lash, you would only ever use these as single (Classic) lash extensions in a 1:1 ratio. While the 0.20mm lash looks even more prominent, this size/weight lash extension is not suitable for this client. In fact, 0.20mm lashes are rarely used in the lashing industry anymore, and we would discourage the use of this lash diameter due to its tendency to damage natural lashes.
So, depending on the desired lash length and overall style, a lash diameter of 0.03mm to 0.15mm would be suitable for this client (and the vast majority of your future clients).
As a general guide, and to assist you later in the course when completing your sets, the below table outlines what lash diameter/s we recommend for your various lash application techniques:
| 0.03mm | 0.05mm | 0.07mm | 0.15mm | |
|---|---|---|---|---|
| Classic | Not recommended | Not recommended | Not recommended | In general, you will use this lash diameter when completing a Classic Set |
| Hybrid | Use any other lash diameter for your fans | Use any other lash diameter for your fans | Use any other lash diameter for your fans | Use this lash diameter for your single (classic) lashes |
| Russian Volume | Not recommended | Use this lash diameter or a 0.07mm for your fans, depending upon how many lashes you incorporate into your fan | Use this lash diameter or a 0.05mm for your fans, depending upon how many lashes you incorporate into your fan | Not recommended |
| Mega Volume | Use this lash diameter or a 0.05mm for your fans, depending upon how many lashes you incorporate into your fan | Use this lash diameter or a 0.03mm for your fans, depending upon how many lashes you incorporate into your fan | Not recommended | Not recommended |
| Textured Classic | Use this lash diameter or a 0.05mm for your fans, depending upon how many lashes you incorporate into your fan | Use this lash diameter or a 0.03mm for your fans, depending upon how many lashes you incorporate into your fan | Not recommended | Not recommended |
For most clients, a safe lash diameter is 0.15mm, and most lash technicians will not use anything above 0.15mm. If your client has thinner lashes or you are going for a ‘classic lash style’, you will usually use a 0.10mm lash. If your client wants a thicker lash, say a 0.18mm, you could counterbalance this increase in diameter with a shorter lash length. A shorter extension weighs less than a longer extension, so you will be able to use a greater quantity of shorter lashes. If you opted for longer extensions, yes, the lashes would be longer, but you will not be able to use as many, meaning the overall look will likely be sparse and wispy.
To make your decision a little bit more complicated, the overall lash style you are trying to achieve will also impact your choice of lash length and diameter! If you are using a ‘classic lash style’, you will be using a lash ratio of 1:1, whereas if you are using a ‘volume lash style’, the lash ratio can be up to 5:1. Put simply, a 1:1 ratio means you are attaching 1 lash to 1 natural lash, and a 5:1 ratio means you are attaching 5 lashes to 1 natural lash.
As you may have already guessed, the larger the ratio, the lower the diameter needs to be to ensure that the weight is not too heavy. This makes sense because the more lashes you are attaching to each natural lash means the overall weight will increase. As a general rule, appropriate diameters for volume lashes in a fan should never exceed 0.10mm. As an example, consider the conversions below:
| The diameter of a classic lash | Is equal to… | Volume lash (fans) |
| X1 0.10mm lash | = | X2 0.07mm lashes |
| X1 0.12mm lash | = | X3 0.07mm lashes |
| X1 0.15mm lash | = | X4 0.07mm lashes |
There are lots of lash conversion charts available which will help you to determine the conversions you need. However, if you are a bit of a mathematician and would like to determine the conversions and/or weights yourself, you can do so using the mathematical equation for the volume of a cone:
Formula for volume of a cone:
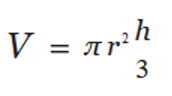
or; V = 1/3 (pi x radius2 x height)
If maths is not really your thing, then get yourself some conversion charts, although it is always a good idea to try and get the basics for yourself!
To learn more about calculating lash weights, visit the following links:
Colour, glitter and diamond
These days lashes also come in a variety of colours, and some also have embellishments such as glitter or ‘diamonds’. Most clients will opt for a more natural look with their lashes, however as you learned earlier in this course, the trend toward coloured and embellished lashes is increasing with popularity. To be able to provide sound advice to your clients about which colours will work best for their skin tone, it is important for you to have a good understanding of the colour wheel and colour theory. Many of us learned the basics of colours at school, and you may even remember songs about the colours of the rainbow! The easiest way to think about the colour wheel is to look at the categories of colours. According to colour theory, there are primary colours (red, yellow and blue), secondary colours (green, orange and purples) and tertiary colours (blue-green or red-violet).
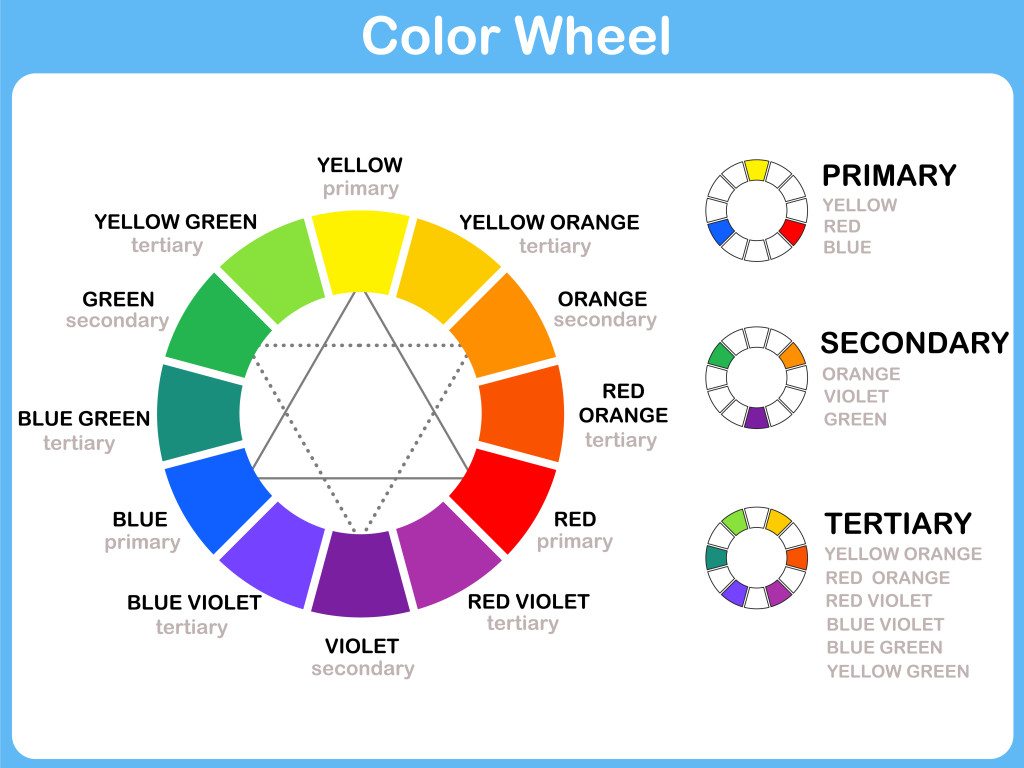
When it comes to selecting colours of lashes for clients, you need to consider their eye colour, skin colour and the look they are going for. Colours that are opposite each other on the colour wheel are categorised as complementary, and they will result in a vibrant, strong contrast. For example, if you have blue eyes, wearing an eyeshadow that has an orange hue will make them pop!
Key phrase | Hue: another word for the term colour and refers to the dominant colour or ‘colour family’ on the colour wheel. For example, the hue of sky blue is blue, the hue of terracotta is orange, and the hue of emerald is green.
Key phrase | Saturation: tells us how colourful colour is in terms of intensity. If there is high saturation, this means the colour will be more intense, and in reverse, if the saturation decreases, the colour will be paler or appear washed-out.
Key phrase | Tonal value: refers to the amount of light that is reflected off the colour, resulting in how light or dark a colour is. For example, fluorescent yellow is brighter than a mustard yellow, so fluorescent yellow would be higher in value (brighter) than the mustard yellow.
Depending on the sort of look your client is going for, you will need to carefully consider the type of hue, saturation and tonal value needed to achieve the look. Additionally, you will need to determine whether or not the colour they have chosen will be complementary. To do this, we can further categorise colours into warm, cool and neutral. If we draw a line and chop the colour wheel in half, cool tones are to the left and warm tones are to the right:

As you can see, cool tone colours include greens, blues and blue-based purple. Warm tone colours include orange, yellow and red. Neutral colours tend to include black, white, brown and grey. There are certain colours that will look better on certain skin tones and undertones.
Key phrase | Skin tone versus undertone: Skin tone (overtone) is the surface skin colour (fair, medium, dark), whereas skin undertone is the subtle hue underneath the surface (warm, cool or neutral).
Knowing which colours work best with your own skin tone and undertone is an excellent place to start when learning to apply colour theory professionally. Most of us know our skin tone in terms of whether we have fair skin, medium skin or dark skin. Our skin tone can change throughout the year, depending on how much sun we are exposed to, whereas our undertone never changes. As a general overview, consider the following recommended colours, which can apply to makeup, clothing and lash extensions with regard to skin tone:
| Skin tone | Recommended colours | Colours to avoid |
| Fair and light skin | Dark brown, burgundy, grey, blues, deep purples, lavender, lilac, sapphire, and emerald greens. | Yellow and orange, as well as any pastel shades or soft colours as they may wash you out. |
| Medium skin | Dusty pink, soft rose, peach, jade green, taupe, grey, off-white and blue. | Bright red, bright yellow and neon colours as they can look overpowering. |
| Olive skin | Orange, red, golden yellow, amber, warm greens, blue, turquoise, moss green, magenta, purple, chocolate brown and creamy whites. | Colder blues, soft greens and yellows as they can be too similar to the undertone of your complexion. |
| Dark skin | Purple, pink, peach, orange, yellow, jade green, cobalt blue and bright colours in general. | Brown, navy and lots of black – these dark colours won’t contrast nearly enough with dark skin and can blend in rather than be complementary. |
Determining your undertone can be a little tricky and can sometimes seem like a bit of a guessing game.
To determine your undertone, consider the following questions:
- What jewellery looks best on you?
People who look better with silver jewellery tend to have cool-toned skin, and those who wear gold usually have warm-toned skin
- What colour are your veins?
People with blue or purple veins are generally cool-toned, and those with green coloured veins are usually warm-toned, and if your veins are blueish-green, then your tone could be neutral
- What colour are your eyes?
People with green or brown eyes tend to have warm undertones, and people with blue or grey eyes tend to have cool undertones.
If you are still struggling to identify your undertone, carefully examine your skin and see what hues appear. If you have pink or red hues, then it is likely you are cool-toned. If you have yellow or golden hues, then you are likely warm-toned. If you have a balance of hues or have olive skin, then it is likely you have a neutral undertone.
Practical exercise – determining skin tone
Look at the celebrities below and see if you can determine who has warm, cool or neutral skin tone:

How did you go with your undertone assessment? If you assessed the celebrities toward the left to be warm toned and those on the right to be cool toned, then you are correct!

If your client wants green lashes, let them live their best life! Now that you have the knowledge of the colour wheel and the impacts of tones, you will be able to guide your client to select the correct hue of green that will be the most complementary to their skin tone and undertone. If you are interested in learning more about determining skin tones or if you haven’t quite managed to determine your own undertone yet, watch the videos linked below:
If you are interested in learning more about determining skin tones or if you haven’t quite managed to determine your own undertone yet, watch the videos linked below: