3.1 Understanding your canvas
Strong and healthy nails are not needed for aesthetic reasons, but they can also be an indicator of a person’s overall health. As a nail technician, you will work with a wide variety of fingernails and toenails throughout your career. In turn, in this lesson, we will look at all of the anatomical components that you will be working with, including the skin, nails, hands and feet.
Did you know that the skin is actually the largest organ of the body? In fact, our skin equates to about 16% of our total body weight! It can be a bit weird to think about our skin as an organ, because usually when we think of organs, we think of our internal organs such as lungs, heart, and brain. Our skin has a really significant role to play as it serves as a protective, waterproof layer to protect our internal organs and also helps us to regulate temperatures, permits sensations (like touch, heat and cold) and helps with our immune defence. As a nail technician, you will work with so many different skin types; having a solid understanding of all things skin-related is a must!
Layers of the skin
The skin across different parts of our body changes; some surfaces can have thin layers, thick layers and another part can be hairy. Regardless of which part of the body, our skin is divided into three layers called the epidermis, the dermis and the subcutis. The table below outlines each layer in more detail:
| Skin layer | Overview | Main roles |
| Epidermis | The epidermis is the outermost layer of skin and provides a waterproof barrier. The epidermis is subdivided into five layers: 1. Stratum corneum 2. Stratum lucidum 3. Stratum granulosum 4. Stratum spinosum 5. Stratum germinativum (basal layer) | Makes new skin cells. Creates our skin tone. Protects the body. |
| Dermis | The dermis is the second layer and is beneath the epidermis. The dermis contains tough connective tissue, hair follicles, and sweat glands. The dermis is further split into two layers: Papillary regionReticular region | Makes sweat and oil Provides sensations and blood to the skin Grows hair |
| Subcutis (subcutaneous or hypodermis) | The subcutis is a deeper subcutaneous tissue (hypodermis) that is not technically skin as it is made of fat and connective tissue. | Attaches dermis to the body Controls body temperature Stores fat |
To put this into perspective, the graphic below shows each of the three skin layers on the right, and on the left, you can see the five layers of the epidermis:
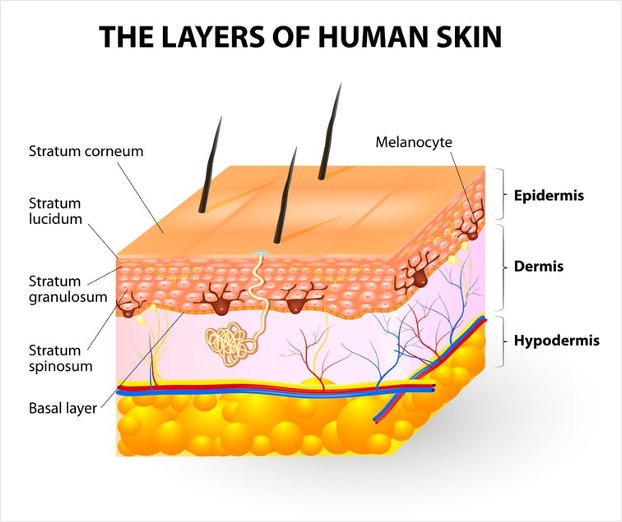
When you are working with clients, you are working predominantly with the client’s epidermis – the outermost layer. Depending on the service and your client’s requirements, you may be required to soften skin, remove skin and treat the skin. For your own understanding, the table below outlines each layer of the epidermis in more detail:
| Epidermis layer | Overview |
| Stratum corneum | The stratum corneum is also known as the surface/horny layer and is the outermost layer of the epidermis. This layer is made up of many microscopic parts, including the microbiome, the acid mantle, the lipid barrier, and layers of dead skin cells. |
| Stratum lucidum | Stratum Lucidum is a translucent layer and lies directly underneath the corneum but is not present all the time. This layer is found only on the palms of the hands, fingertips, and the soles of the feet. |
| Stratum granulosum | Stratum Granulosum is also known as the granular layer and lies underneath the lucidum. Skin cells break down in this layer, and keratin is impregnated into the cells. There is a process known as ‘keratinisation’ whereby cells begin to lose their structure and eventually die. |
| Stratum spinosum | Stratum Spinosum is also known as the prickle cell layer or squamous cell layer and lies under the Granulosum. This layer rapidly divides as keratin is pushed into them, making their cells tough and waterproof. This is the thickest layer of the epidermis. This layer gives the skin strength as well as flexibility. |
| Stratum germinativum (basal layer) | Stratum Germinativum, also known as the basal layer, is the innermost layer of the epidermis. This is where the skins most important cells, called keratinocytes, are formed before moving up to the surface of the epidermis. This is a living layer that receives its blood supply from the dermis. It produces new cells which reproduce by mitosis (each cell divides into two), which are pushed up through the overlying layers of the epidermis where they eventually lose their nuclei and die, which aids in continually repairing the skin. Melanocytes (pigment-producing cells) are found in this layer, and they are responsible for our skin colour and help protect us from UV. |
If you would like to learn more about the layers of the skin and layers of the epidermis in general, you may like to access the resources linked:
Anatomy and physiology of nails
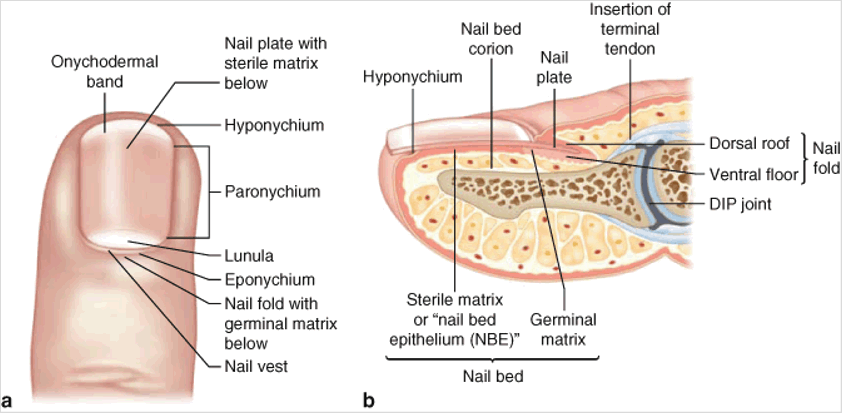
Now that you have a basic understanding of skin let’s delve further into the anatomical components of nails specifically. In terms of the skin layers specific to nails, the nail grows from a deep groove in the dermis of the skin. Put simply; nails start growing under your skin. As new cells grow, they push old ones through your skin, and the old cells flatten and harden, thanks to keratin, a protein made by these cells. The nails we can are essentially dead cells – this is why it doesn’t hurt us when we cut our nails! In terms of nail anatomy, the structures that define and produce the nail (nail plate) include the matrix (sterile and germinal), the proximal nail fold, the eponychium, the paronychium, and the hyponychium. Let’s look at each key anatomical component:
| Distal phalanx | The distal phalanx of the finger is the distal or third of the three bones in each finger when counting from the hand to the tip of the finger. |
| Eponychium (cuticle) | A layer of stratum corneum extends between the skin of the finger and the proximal nail plate. The function of the cuticle is to protect the area between the nail and epidermis from exposure to bacteria. People often think eponychium is the cuticle (can also be referred to as the live cuticle) and cut this off during the manicure or pedicure process. The eponychium must never be cut! The cuticle, however, is the clear, thin layer that sheds from the eponychium and attaches to the nail plate. As the nail plate grows, the cuticle grows out with it. This is the only part that should be removed or trimmed. This must be done with great care so as not to cut the live eponychium. |
| Hyponychium | The hyponychium is the skin just under the free edge of the nail. It’s located just beyond the distal end of the nail bed, near your fingertip. The function of the hyponychium is to act as a barrier from germs and debris. The hyponychium stops external substances from getting under your nail. |
| Lunula or Half Moon | The lunula or half-moon, that whitish crescent at the base of the nail, is the only visible portion of the matrix. Lunulae cover the bottom of the nail, just above the cuticle. It is not always prominent, although it usually is always visible on the thumbnail, diminishing in size until the little finger, where it may not be visible. |
| Nail bed (sterile matrix) | The nail bed is the continuation of the nail matrix. Acting as a support bed for the nail plate, it plays a vital role in the health, colour and texture of the nail. It extends from the edge of the germinal matrix or lunula to hyponychium. |
| Nail folds (lateral and proximal nail fold) | Nail folds are the skin that surrounds and protects the proximal and lateral margins of the nail plate. The nail is framed by the lateral nail folds on the left and right sides of it. The skin bordering the lower end of the nail is called the proximal nail fold. |
| Nail plate | The outer portion of the nail unit, formed by layers of keratin. It forms a hard yet flexible, translucent plate. |
| Nail root (germinal matrix) | The root of the nail is also known as the germinal matrix. Cells within the germinal matrix divide and become keratinised to form the nail plate. Continuous cell division within the matrix ‘pushes’ the nail plate over the bed as it matures. The germinal matrix is responsible for 90% of nail growth. |
| Nail tip or free edge | The nail tip or free edge is the free part of the nail bed and protrudes beyond the end of the finger. How far is a matter of taste. This is the most vulnerable part of the nail and can easily be damaged by impact, incorrect filing, etc. |
| Onychodermal band | The Onychodermal band is the “natural smile line” of the nail unit, where the nail bed epithelium bunches up to pass through the tight seal of the hyponychium, creating a grey line at the edge of the nail bed before the free edge of the nail plate. |
| Paronychium | The paronychium is the skin that overlaps onto the sides of the nail plate, also known as the paronychial edge. The paronychium is the site of hangnails, ingrown nails, and paronychia, a skin infection. |
To better explain each anatomical part of the nail, view the following image:
While not essential for survival, our fingernails and toenails really help to make life a lot easier as they can help us to dig, climb, scratch and grab objects. The nail itself serves as a protective barrier which prevents our fingers and toes from getting cut or damaged as we go about daily activities. Our nails are continually growing, and our fingernails grow faster than our toenails. In terms of growth timeframes, fingernails take approximately 6 months to grow from the nail root (germinal matrix) to the free edge, averaging 3mm per month. In contrast, our toenails can take anywhere from 12 to 18 months, averaging 1mm per month.
Did you know…
Nails grow faster in summer because your body produces more vitamin D in daylight, which is important for nail growth. Additionally, the nails on your dominant hand grow faster than the rest due to increased movement and circulation!
While the average nail growth is between 1mm to 3mm a month, there are a range of factors that impact how quickly our nails grow. The table below outlines a few for you to consider:
| Factors impacting nail growth | |
| Age | The speed of nail growth changes throughout our lifetime. Children’s nails tend to grow more quickly than adults. It is also said that nails tend to grow the fastest between the ages of 10 and 14. As we get older, nail growth continues to slow with age. In fact, as early as the age of 25, the growth rate of nails slows by about 0.5% per year. So by the age of 85, your fingernails may only be growing 2mm in length per month! |
| Season | Where you live can impact your nail growth because nails grow faster in warm weather than they do in cold weather. |
| Location of the nail | The nails on your dominant hand are said to grow faster simply because you use your dominant hand more, which increase circulation. As covered earlier, fingernails grow more quickly than toenails. The rate of growth also differs between nails. 2007 found that the fingernail on your little finger grows slower than other fingernails. |
| Hormones | Your hormones can also affect the growth rate of nails. Take pregnancy, for example. During this time, women may experience a dramatic increase in estrogen and progesterone. These hormonal changes attribute to rapid nail growth during pregnancy, but decrease the rate of nail growth during lactation. Hormones are also the reason why our nails grow the fastest during the ages of 10 and 14. Our hormone levels peak during puberty, and then they balance out as we age. |
| Health | Our overall health can impact our nail growth, as well as the shape and overall appearance of our nails. Yellow nails may indicate diabetes, while yellowing thick nails that grow slowly might be a symptom of a lung condition. |
| Biting | Unbelievably, onychophagia (the chronic habit of biting your nails) has actually been associated with a faster growth rate. The reason for this is that biting causes trauma to the nail, stimulating circulation in the nail bed. Using the same premise, frequent nail clipping can also help your nails to grow a little faster. |
The food we eat, the time of year and medications that we are taking can also impact nail growth. There has been a lot of research into ways to help nails grow quicker, stronger and healthier. Examples include, but are not limited to:
- Using cuticle oils daily
- Taking supplements
- Eating a balanced diet
- Avoiding harsh soaps, cleaners and nail products
- Regular manicuring nails
So, how can you tell if you have healthy nails or not? The table below outlines the differences between a healthy nail and an unhealthy nail:
Healthy nail
- No inflammation
- Natural sheen
- Supple and unbroken cuticle
- Pink glow under the nail bed
- No ridges or spots
- Unbroken free edge

Unhealthy nail
- Inflammation
- Discolouration
- Changes in nail shape (curling or clubbing)
- Bleeding, swelling or pain around the nail
- Nail separating from the skin
- Brittle nails
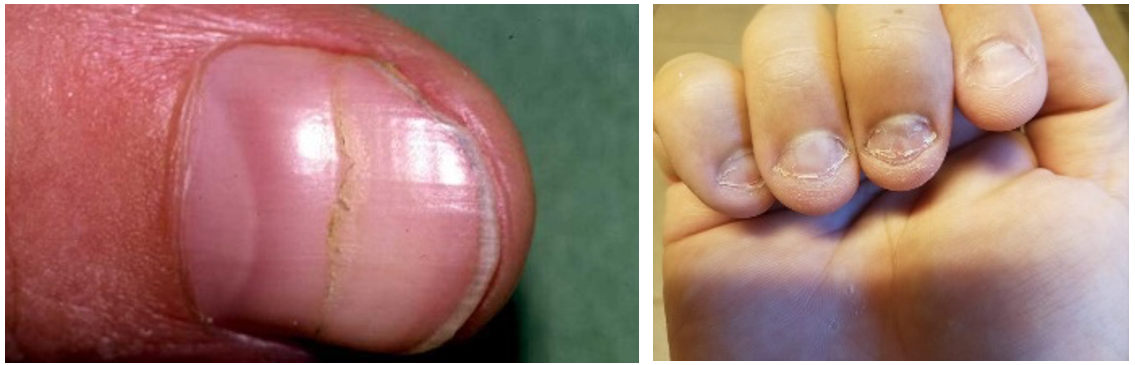
As a nail technician, it is essential that you have a solid understanding of nail conditions so that you do not cause any further damage to clients who have unhealthy nails. We will cover nail conditions in more detail in the contraindications lesson.
If you would like to learn more about the anatomy and physiology of nails, you may like to access the resources linked:
Did you know…
Your nails are made of keratin. Keratin is a type of protein that forms the cells that make up the tissue in nails and other parts of your body. Keratin plays a key role in nail health. It protects nails from damage by making them strong and resilient. Keratin forms the cells of your hair and skin, too.
Anatomy and physiology of lower arms and hands
At a basic level, the anatomy of an arm has four sections – the upper arm, the forearm (lower arm), the wrist and the hand. As a nail technician, your time will be concentrated on the forearm when performing massage and, of course, the wrist and hand when completing a manicure or nail enhancement. Our arms are made of bones, muscles, nerves, tissues, and joints. As a general overview, the table below provides an overview of the bones and muscles of the hand and arm to be aware of:
| Location | Bones and muscles |
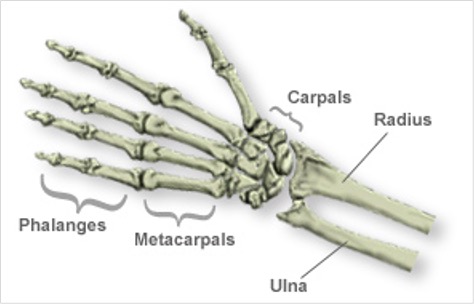
| Forearm | The forearm consists of two long bones – the radius and the ulna. The ulna is longer and larger than the radius, and it is on the side of the forearm that’s closest to your little finger. The radius is located on the side of the forearm closest to your thumb. It twists around the ulna and can change its position depending on how the hand is moved. There are many muscles attached to the radius that aid in the movement of the elbow, wrist, and finger joints. There are twenty muscles of the forearm. These muscles are split into the anterior (flexor) and posterior (extensor) compartments, and then each of those is divided into superficial and deep compartments. |
| Hand | The bones of the hand can be divided into three categories: the carpus (wrist), metacarpus (palm) and the phalanges (bones of the fingers). Our hands have 27 bones, 27 joints, 34 muscles, over 100 ligaments and tendons, and many blood vessels and nerves. |
As explained, there are more than 30 individual muscles in the hand and forearm work together so that we can grip and move our hands in the directions we need. View the following images to better understand the anatomy of the forearm and hand:
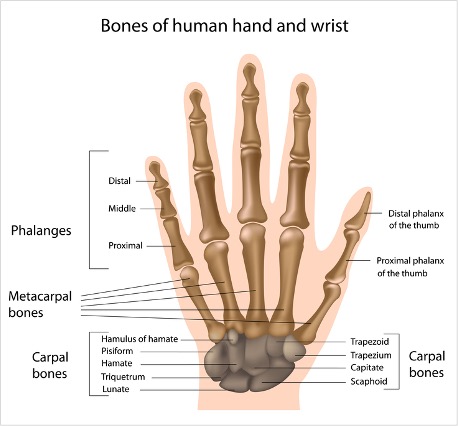
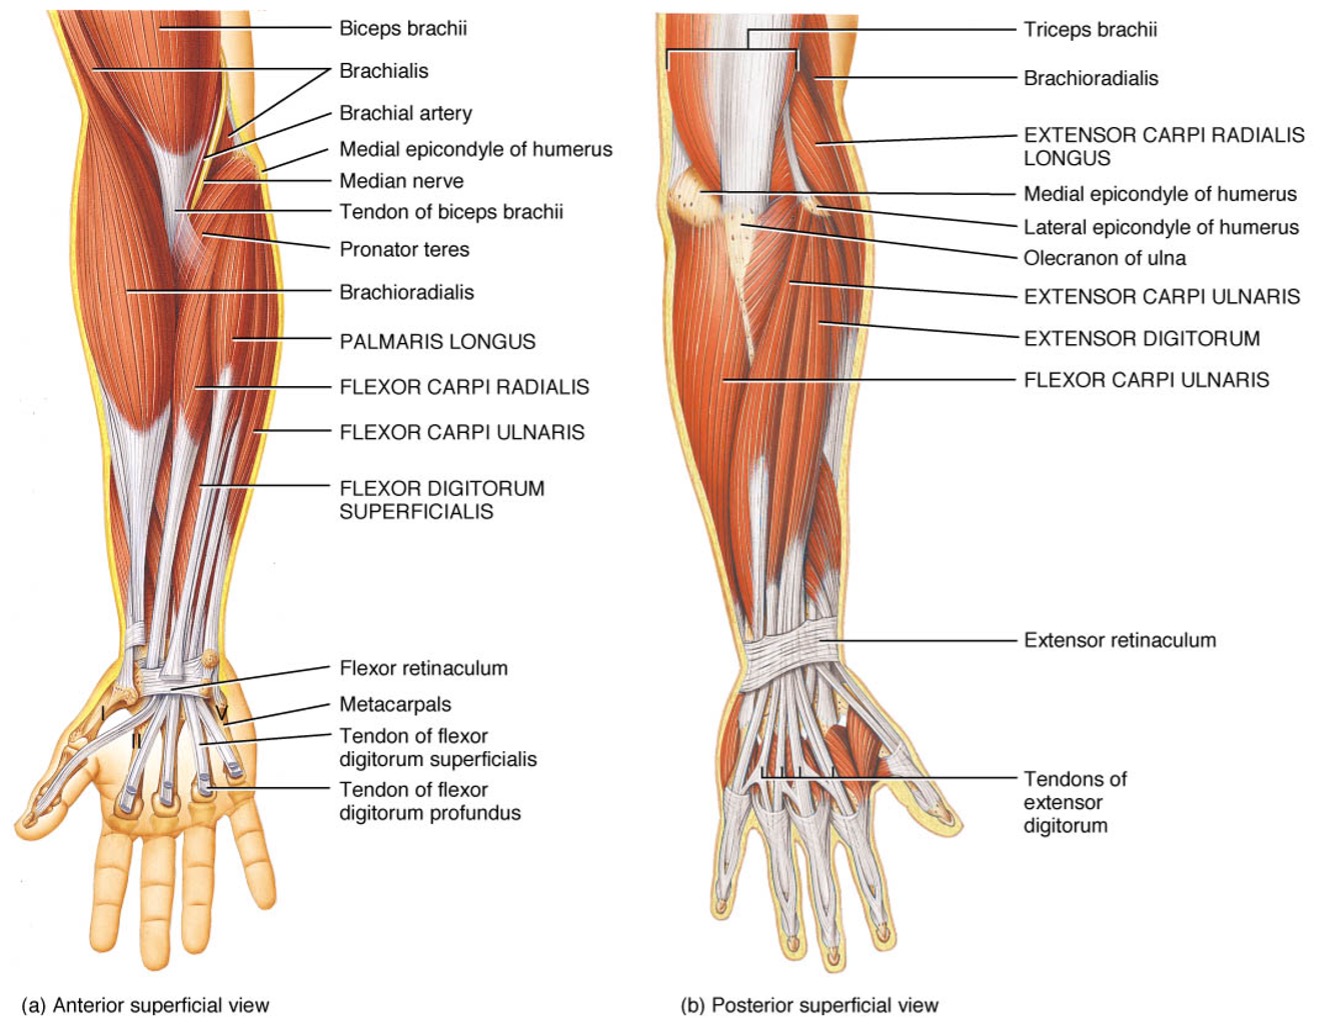
As you can see – there are heaps of anatomical features of the arms and hands! While you don’t need to remember all of them, it is good to have a general understanding of the areas you are working with and how they interlink.
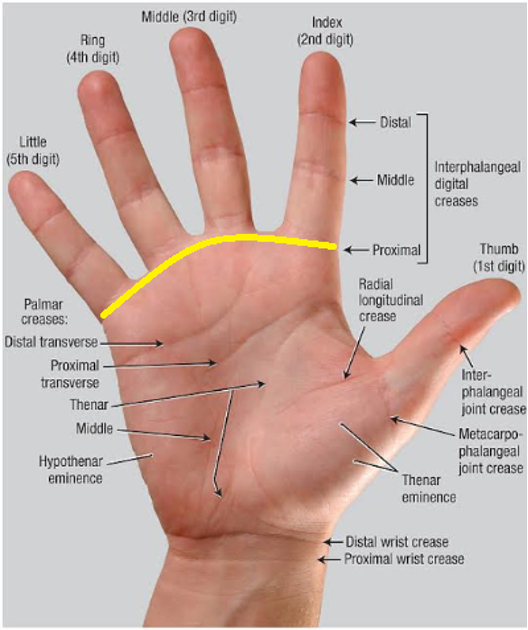
If you are interested in learning more about the anatomy of lower arms and the hands, access the resources linked:
Anatomy and physiology of lower legs and feet
Now that you have a general understanding of the anatomy and physiology of the arm and hand, we can now move onto the legs and feet! Just like the arms and hands, our legs and feet have bones, muscles, nerves, tissues, and joints. In fact, each foot is made up of 26 bones, 33 joints and more than 100 muscles, tendons and ligaments, all of which work together to provide support, balance, and mobility. Our legs can be classified into five categories:
- Upper leg
- Knee
- Lower leg
- Ankle
- Foot
As a nail technician, you will largely be working with the lower leg, ankle and foot during pedicure treatments such as gel toes. The table below provides an overview of the bones and muscles of the lower leg, ankle and feet to be aware of:
| Location | Bones and muscles |
| Lower leg | The lower leg is the portion of the leg from the knee to the ankle, also commonly referred to as the calf. There are two bones in the lower leg – the tibia and the smaller fibula. The tibia (shinbone) is the main weight-bearing bone in the lower leg and is closer to the midline of the body. The fibula is the smaller, thinner bone of the lower leg and is located next to the tibia. The main lower leg muscle is the gastrocnemius which allows us to point our toes downward. The tibialis muscles are found on the front and back sides of the lower leg and allow us to point our toes upward. |
| Ankle | The ankle consists of the tibia and fibula of the leg, as well as the talus of the foot. Our ankles contain two groups of ligaments – medial (inner ankle) and lateral (outer ankle). These ligaments help to stabilise the ankle making sure that we do not overextend too far outward or inward! |
| Feet | As mentioned earlier, the foot is made up of 26 bones; in fact, nearly one-quarter of the bones in the body are found in the feet! The categories of bones in the foot include: – Tarsals – Metatarsals – Phalanges – Sesamoids In addition to bones, the feet have various muscles and ligaments which help to support us and our movements. |
View the following images to better understand the anatomy of the legs and feet:
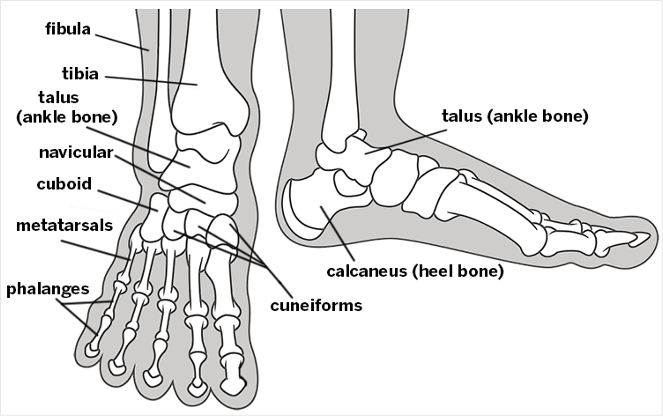
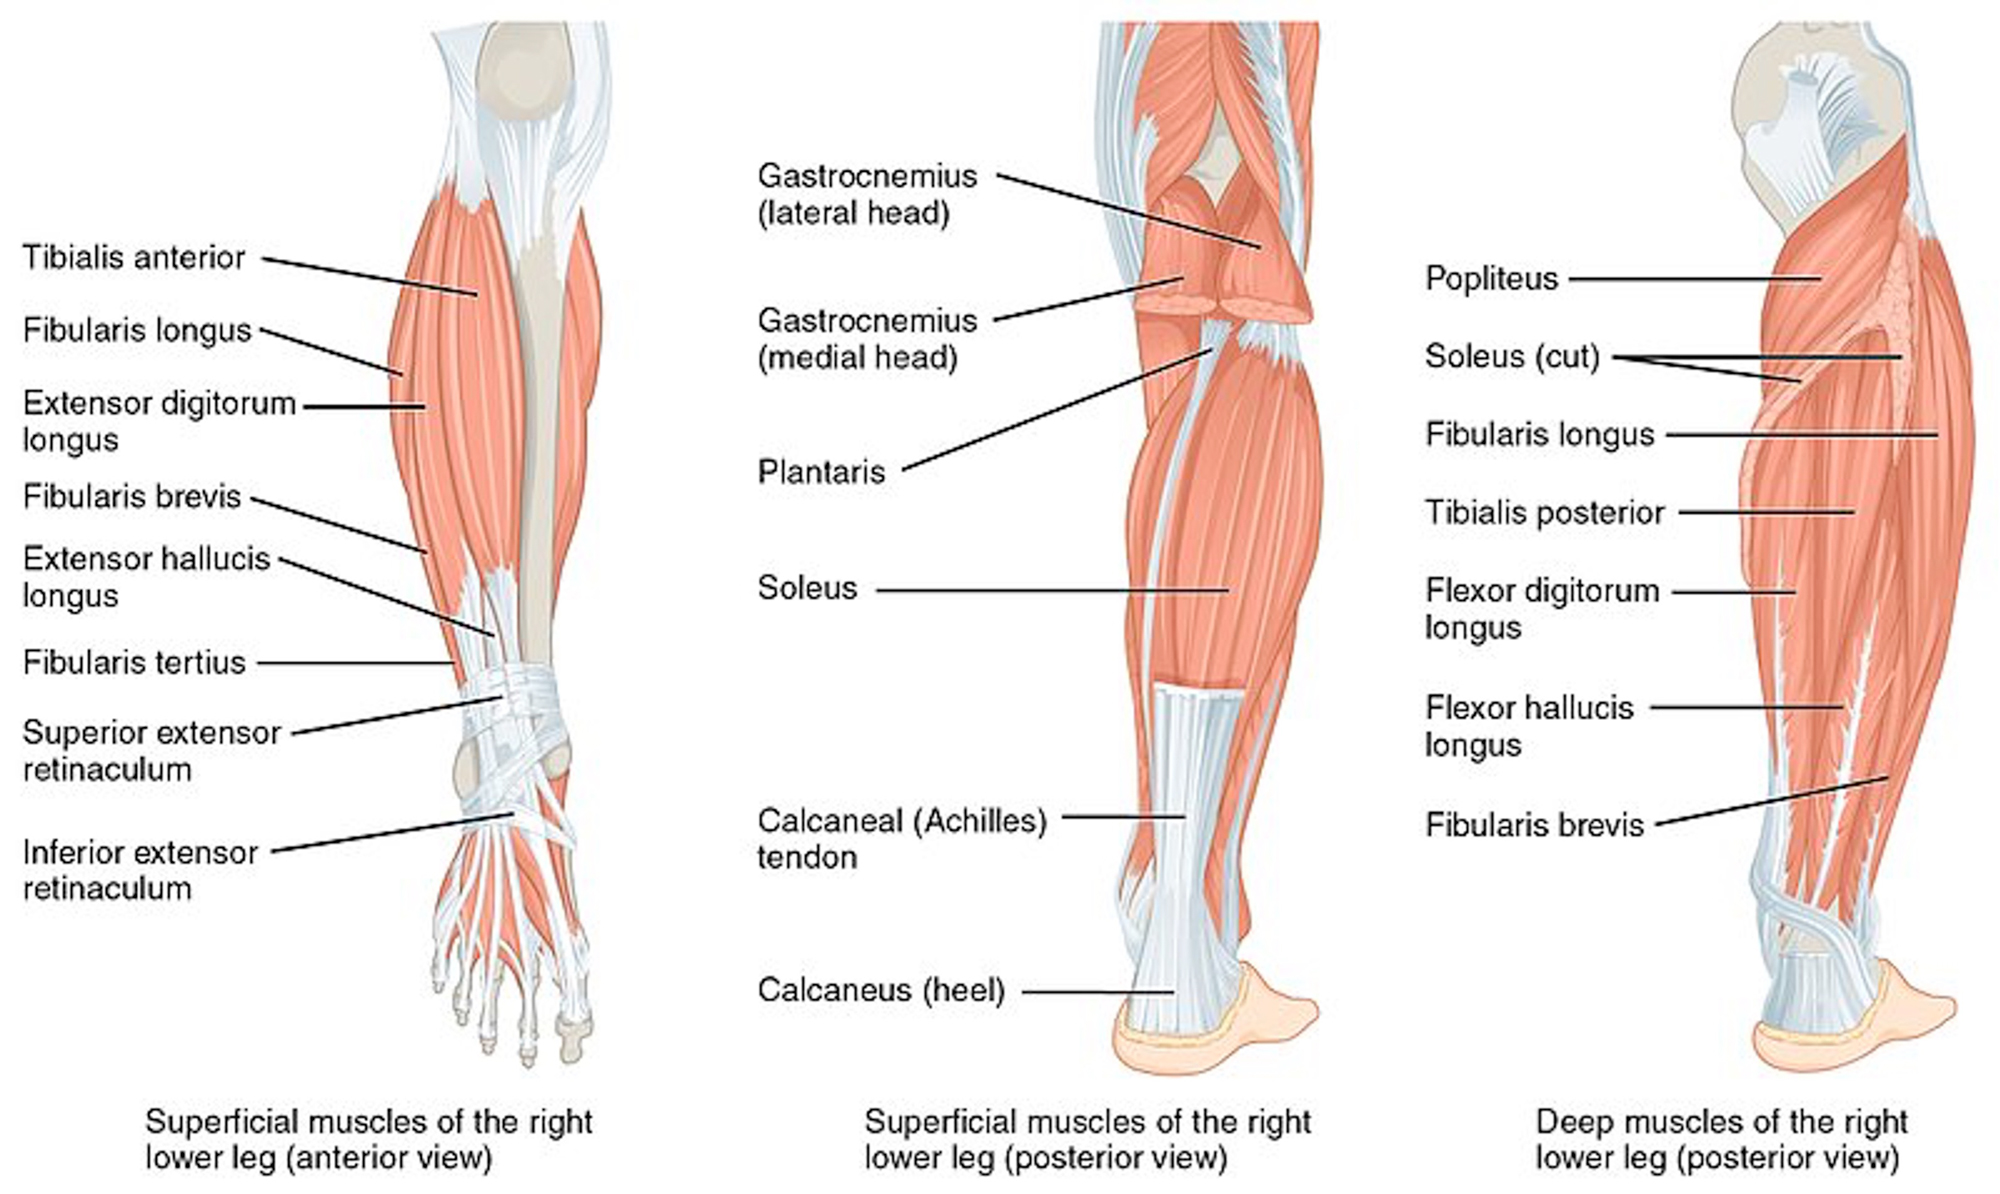
If you are interested in learning more about the anatomy of lower legs and feet, access the resources linked:
pH range of human skin, nails and manicure and pedicure treatment products
To finish off this lesson, we will look at the pH levels of your client’s skin and the products we use. Put simply; pH is a measurement figure expressing the acidity or alkalinity of a solution. You may have seen pH scales before:
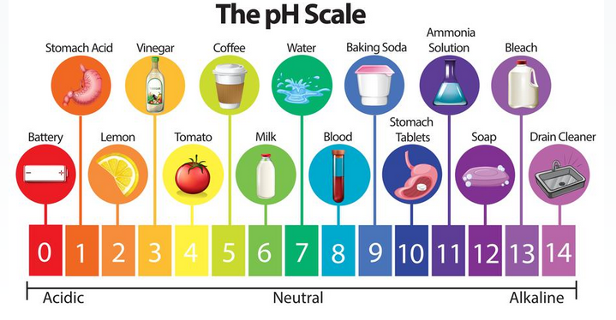
As you can see on the scale above, a battery is very acidic, and solutions such as bleach are alkaline, with water being neutral. In terms of the pH level of our skin, it is said that the optimal level is between 4.5 and 5.5 for women. All of us have something known as the ‘acid mantle’ layer of the skin, and this essentially describes how acidic our skin is.
Key phrase: Acid mantle
Your acid mantle is a balanced microflora ecosystem made up of sebum (an oily, waxy substance produced by your body’s sebaceous glands), fatty acids, lactic acid, amino acids and sweat, which keeps out viruses, bacteria, and other harmful microbes. It’s essentially a thin, protective film that covers your skin and is also slightly acidic with a pH between 4.5 and 5.5 (which is why it’s called the acid mantle).
Dermatologists suggest that oily skin will usually have a pH range from 4 to 5.2, with dry skin having a pH above 5.5. The pH of our nails is approximately 5.5. Now, you won’t be doing any dermatological tests to determine your client’s pH level, but it is important to know what to look out for because you may need to balance out pH levels on the client’s skin. Our nails are more on the acidic side, and this helps to ensure that they do not get too greasy. However, if our nails become too alkaline, our nail beds might actually begin producing more oil – which can impact the longevity of nail polish. So, if you have a client whose nail polish seems to chip really easily, it might indicate an alkaline pH level.
There are a range of pH balancing products on the market, including base coats, bond aids and nail dehydrators which help if a client is either too acidic or alkaline. Using pH adjusters can help to ensure the surface of the nail is prepped to promote adhesion, whether that be for nail polish or nail enhancements. As a guide to best practice, always review the pH levels of your products as well. If you do not correctly remove certain products such as cuticle creams or cleansers, this may alter the pH levels.
If you are interested in determining the pH levels of your own skin, the table below outlines what you can look out for to determine whether or not your acid mantle is too acidic or too alkaline:
| Acid mantle might be too acidic because: | Acid mantle might be too alkaline because: |
| – You rarely need to use moisturiser – Your skin is reactive and sensitive to products – Your skin is oily and prone to blackheads, pimples and acne – Your skin often feels irritated or red – Your skin looks greasy – You wake up with an oily face | – Your skin feels tight and dry after cleansing – You need to apply moisturiser throughout the day because your skin gets too dry – You sometimes get dry or rough patches or flaky bits on your skin – Your skin looks dull and in the morning shows more lines and wrinkles – Your skin rarely appears plump and dewy |
So, if you tend to have oilier skin, your acid mantle may be too acidic, and if your skin is dry or flaky, your skin may be too alkaline. Our pH levels also change continually based on what we eat, how much sleep we get, our stress levels and the environment we live in.
Other factors which can impact our skin pH include, but are not limited to:
- Change in seasons, with different humidity levels and pollution
- Ingredients in cosmetics, detergents, antibacterial soaps and gels
- Sebum, skin moisture and sweat
- Overexposure to the sun
- Too frequent washing of your skin or skincare routine is too harsh
When trying to determine a clients pH levels on face value, it is useful to think about the four common skin types: normal, oily, dry and combination. The table below outlines each skin type in more detail:
| Skin type | Overview | What to look for |
| Normal | A normal skin type is where the skin is well balanced and healthy. This means that it is neither oily nor dry, and normal skin will usually have balanced sebum and good blood circulation. | – Fine pores – Good blood circulation – Soft and smooth texture – No blemishes – No sensitivities |
| Oily | An oily skin type is where there are higher levels of sebum production. Clients with this skin type will likely have a glossy shine to the skin, visible pores and may be prone to acne breakouts. | – Enlarged and clearly visible pores – Blackhead and whiteheads – A glossy shine – Acne |
| Dry | A dry skin type is where there is not enough sebum produced in contrast to the ‘normal’ skin type. Usually, dry skin will lack the lipids needed to retain moisture. This skin type can feel tight, rough, flaky and may look dull. | – Mild scaling or flakiness in patches – A rough and blotchy appearance – A feeling of tightness – Possible itchiness – Sensitivities |
| Combination | As the name suggests, a combination skin type is a mix of skin types. If your client has an oily T-zone but dry cheeks, this would indicate a combination skin type. | – An oily T-zone (forehead, chin and nose) – Enlarged pores in this area, perhaps with some impurities – Normal to dry cheeks |
In addition to the four skin types above, we also need to consider sensitive skin and mature age skin. A client with a sensitive skin type will usually be prone to inflammation and reactions to certain products. Clients with sensitive skin may have strong reactions to chemicals, dyes and fragrances, so you will need to be very careful with the sorts of products you use. As we get older, our skin begins to change, and it will usually become thinner, lack hydration, and we will begin to form wrinkles.
When we are working with skin on any area of the body, we must ensure that we are mindful of the products we use and the natural skin that our clients have. You may have clients who have super dry and cracked heels but very soft hands – it all depends on the individual!
If you are interested in learning more about skin types, access the resources linked:
Once you have a better understanding of the type of skin your client has, you can then make some assumptions about the pH levels you are working with. If you remember from earlier, clients who have oily skin will usually be more acidic, and clients with dry skin will tend to be more alkaline! In addition to your client’s natural pH levels, you also need to consider the pH levels of your products. You can have pH balances in your kit, but aside from that, there is not much else you can do to adjust pH levels for your clients. If your client has any serious skin conditions, it is not your job to diagnose them! They should seek further advice from a dermatologist, podiatrist or other health professional.